
Main Courses
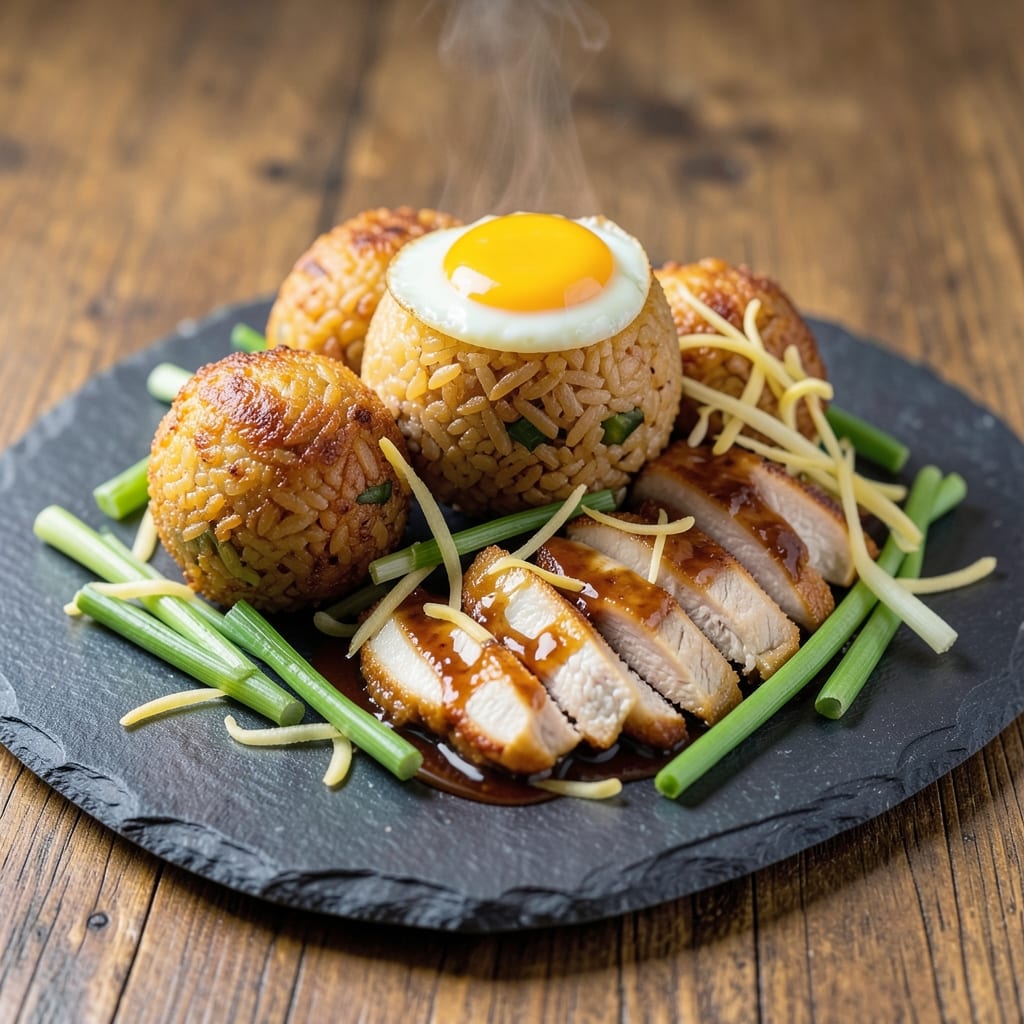
This Asian fried rice balls recipe delivers the perfect balance of crispy egg crusts and chewy rice hearts—every bite is a textural masterpiece. 💛 The secret lies in using day-old rice (never fresh) and a precise frying technique that creates golden, shatteringly crisp exteriors while keeping the centers tender. I've perfected this version after testing multiple cultural adaptations, from Thai-inspired flavors to Japanese-style fillings.
The beauty of these rice balls is their versatility—you can customize the filling with proteins like chicken, shrimp, or tofu, or keep it vegetarian with mushrooms and peas. The egg coating creates that signature crispy shell, while the rice stays delightfully chewy inside. This recipe serves as both an appetizer and satisfying main course, making it perfect for parties or weeknight dinners.
What makes these fried rice balls truly special is how they transform simple ingredients into something restaurant-worthy. The frying process is straightforward once you master the oil temperature, and the results are impossible to resist—crispy on the outside, tender on the inside, with a flavor profile that's both comforting and exciting. Serve them with a tangy sweet chili sauce or soy-vinegar dip for the ultimate experience.
Whether you're making these for a crowd or just craving a comforting snack, this recipe delivers foolproof results every time. The key steps—proper rice preparation, careful shaping, and precise frying—ensure you'll achieve that perfect balance of textures and flavors. Let's get started on creating these crispy, chewy delights!
Ingredients for asian fried rice balls
These crispy, chewy Asian fried rice balls transform simple ingredients into restaurant-worthy bites—perfect for any occasion.
| Ingredient | Amount | Notes |
|---|---|---|
| Day-Old Jasmine Rice 🍚 | 3 cups | Cooked and cooled completely |
| Large Eggs 🥚 | 3 whole | Room temperature preferred |
| Chicken Breast 🍗 | ½ lb | Diced into small pieces |
| Green Onions 🧅 | ¼ cup | Finely chopped, white and green parts |
| Fresh Ginger 🌿 | 1 tbsp | Finely grated, aromatic |
| Soy Sauce 🍶 | 2 tbsp | Light or all-purpose variety |
| Sesame Oil 🫒 | 1 tbsp | Toasted for nutty flavor |
| Vegetable Oil 🫒 | 2 cups | High smoke point for frying |
| Salt 🧂 | 1 tsp | Diamond Crystal preferred |
| Black Pepper 🌶️ | ½ tsp | Freshly ground for best flavor |
| Garlic Cloves 🧄 | 3 cloves | Minced for aromatic base |
| Vegetable Oil Spray 🫧 | 1 tbsp | For shaping and crisping |
| Sweet Chili Sauce 🍅 | ¼ cup | For dipping (optional) |
The rice is non-negotiable—day-old works best (fresh rice turns mushy). Jasmine rice is ideal for its sticky texture, but basmati in a pinch works too. For the chicken, boneless, skinless breast is easiest to dice finely—Costco or Trader Joe's often have pre-cut packages. Fresh ginger is a game-changer here: buy it whole and grate it yourself (the pre-grated stuff loses flavor fast). If you can't find fresh, 2 tsp ground ginger works in a bind. The soy sauce should be light—Kikkoman is foolproof, but any all-purpose will do.
No chicken? Shrimp or tofu are fantastic swaps—just pat dry thoroughly before mixing into the rice. The eggs need to be room temperature for even cooking (cold eggs cause cracking). For extra crispiness, add 1 tbsp cornstarch to the rice mixture. The sesame oil is non-negotiable—toasted sesame oil from Trader Joe's or Asian markets adds that nutty depth. No sesame oil? 1/2 tsp toasted sesame seeds sprinkled on top after frying adds texture. The green onions? Use both white and green parts—the white adds flavor, the green adds color.
These keep for 2 days in an airtight container, but honestly? They're best fresh. Freeze extras on a tray first, then transfer to a bag—they reheat beautifully in the air fryer or oven. For extra crispiness, re-fry for 1-2 minutes before serving. The filling can be prepped ahead and stored in the fridge for 1 day—just shape and fry when ready. Pro tip: Double the batch—they disappear fast at parties!
Why You'll Love This Recipe
- No Chopping Needed: I swear by this trick—just shred the chicken and slice the ginger once at the start. The green onions go in whole for easy cleanup, and the rice? Use whatever’s leftover from last night’s meal. Minimal prep, maximum flavor.
- Ginger-Lime Crunch: That fresh ginger and a squeeze of lime (trust me, add it at the end) turn these into something special. The rice balls stay tender, the chicken stays juicy, and the crispy edges? They’re the kind of bite that makes you reach for seconds without thinking.
- Lunchbox Hero: Between us, these are my go-to for packed lunches. They reheat beautifully—just a quick pan or microwave—and the kids actually eat them. (Yes, even the picky ones.) Plus, they’re cheap enough to make a batch for the week without breaking the bank.
- Leftovers? Better Than New: Honestly, I make double. The flavor actually deepens overnight, and they’re perfect cold for work lunches or hot for a lazy dinner. No sad, dried-out rice here—the eggs and ginger keep them fresh-tasting for days.
Step-by-step instructions for crispy egg-crusted Asian fried rice balls
Here's how to transform day-old rice into golden, crunchy bites with a chewy center—this is where the magic happens.
👨🍳 Step 1: Prepare the Rice Mixture with Aromatics
In a large bowl, gently break up the 3 cups day-old jasmine rice with your hands until it resembles coarse crumbs. This texture is crucial for proper binding later. Add the 0.5 lb diced chicken breast, 0.25 cup finely chopped green onions, 1 tbsp finely grated fresh ginger, 3 minced garlic cloves, 2 tbsp soy sauce, and 1 tsp salt. Mix everything together until the chicken is evenly distributed and the rice is well-coated with the seasonings.
Here's the thing—don't overmix or you'll get dense, compact balls. Just combine until everything is incorporated. The rice should look like a wet, flavorful sand that holds together when pressed. If it feels too dry, add 1-2 teaspoons of water to help the mixture bind. Let this sit at room temperature for 10 minutes while you prepare the egg wash—this resting period helps the flavors meld.
🍳 Step 2: Create the Egg Crust and Shape the Balls
In a separate bowl, beat the 3 whole large eggs with a fork until just combined. Add 0.5 tsp black pepper and 1 tbsp toasted sesame oil, whisking until smooth. This is your crispy crust—don't skip the sesame oil, it adds that authentic nutty depth.
Working in batches, take about 1 cup of the rice mixture and gently press it into a ball (about 2-inch diameter). Roll it in your palms to create a smooth surface, then dip it into the egg wash, coating it evenly. Place on a parchment-lined plate and repeat until all mixture is used. Here's the secret: keep the balls slightly irregular—they'll crisp better than perfectly round ones. Let them rest for 5 minutes while you heat the oil.
🔥 Step 3: Fry to Golden Perfection
Pour the 2 cups vegetable oil into a deep skillet or Dutch oven and heat to 350°F—this is your sweet spot for crispy exteriors without greasy centers. Use a thermometer to monitor the temperature carefully; if it gets too hot, the egg crust will burn before the rice cooks through.
Working in batches (don't overcrowd!), carefully lower the rice balls into the oil using a slotted spoon. Fry for 3-4 minutes until they're deep golden brown on all sides. The egg crust should look set and slightly puffed, while the rice inside should be gently steaming. Use tongs to turn them gently—if they stick, the oil isn't hot enough. Transfer to a paper towel-lined plate to drain.
🔪 Step 4: Add Final Crisp with Oil Spray (Game-Changer!)
Here's where we take these from good to extraordinary. While still warm, spray each fried rice ball lightly with 1 tbsp vegetable oil spray and return them to the 375°F oven for 2-3 minutes. This final step creates that irresistible extra-crispy exterior while keeping the centers chewy. Watch them closely—they'll darken quickly!
For maximum crispiness, I like to spray them again after the first minute in the oven. The residual heat from the oil spray will create steam inside, helping maintain that perfect texture contrast. Remove immediately when they reach golden brown—they'll continue crisping as they cool.
🍽️ Step 5: Serve with Sweet Chili Sauce
Let the fried rice balls cool for 2-3 minutes before serving—this helps them set completely. Arrange them on a platter and serve immediately with the 0.25 cup sweet chili sauce for dipping. The contrast of crispy exterior, chewy rice center, and sweet-spicy sauce is what makes these irresistible.
Pro tip: For extra flavor, sprinkle with additional finely chopped green onions right before serving. These bites are best enjoyed fresh when the crust is at its crispiest. Store any leftovers in an airtight container, but honestly? They won't last that long!
Pro Tips For Making Asian Fried Rice Balls
- CHOP CHICKEN SMALL: Cut the chicken into ½-inch cubes—no bigger, or they’ll stay rubbery. I used to slice mine too thick, and they’d overcook before the rice balls got crispy. Small pieces also brown faster, which adds flavor.
- USE COLD RICE: Spread day-old rice on a tray and pop it in the fridge for 30 minutes before mixing. Cold rice sticks together better when forming balls, and it won’t turn mushy when fried. Trust me, this is the thing that matters most for shape.
- SCRAMBLE EGGS FIRST: Cook the eggs separately into a dry, crumbly scramble before mixing with rice. This keeps the texture light and prevents the rice balls from turning into a wet, sticky mess. Save the egg yolk for dipping—it’s worth it.
- PRESS BALLS FIRM: Pack the rice mixture tightly into balls—no half-hearted mounds. Firm pressure means they’ll hold together when frying, and the outside gets that satisfying crust. I learned this the hard way when mine fell apart mid-fry.
Regional styles of this dish
Thai-Inspired Khao Kluay Tom
In Thailand, these rice balls are called khao kluay tom and often include a spicy-sweet filling. Swap the chicken for 1 cup cooked and diced Thai basil pork, then mix in 1 tbsp palm sugar and 1 tsp chili flakes with the soy sauce. Garnish with crushed peanuts and Thai bird's eye chili slices before serving. The sweet-spicy contrast is what makes this version stand out. 🌶️
Japanese-Style Onigiri Twist
For a Japanese-inspired take, shape the rice balls into triangular onigiri using your hands. Wrap each with a strip of nori seaweed before frying, and add 1 tbsp pickled plum (umeboshi) paste to the filling for a tangy kick. Serve with a side of soy-vinegar dip made with 2 tbsp rice vinegar, 1 tbsp soy sauce, and 1 tsp honey. This version is lighter but equally crispy.
Filipino Silog-Inspired
Filipino-style fried rice balls often include a garlic-shrimp filling. Sauté 4 oz shrimp with 2 tbsp minced garlic and 1 tsp soy sauce before mixing into the rice. Add 1 tbsp calamansi juice (or sub with lemon juice) for brightness. Serve with a spicy vinegar dip made from 2 tbsp vinegar, 1 tsp sugar, and ½ tsp chili flakes. The tangy, garlicky flavors are pure comfort food. 🍤
Vegetarian Mushroom Version
For a meat-free option, replace the chicken with 1 cup sautéed shiitake mushrooms and ½ cup corn kernels. Add 1 tbsp hoisin sauce and 1 tsp five-spice powder to the filling for depth. Garnish with toasted sesame seeds and thinly sliced scallions. This version is just as satisfying and works perfectly for veggie-lovers or meat-free meals.
Sweet & Savory Fusion
Craving something sweeter? Mix ½ cup diced pineapple into the rice filling and add 1 tsp coconut sugar to the egg wash. After frying, drizzle with a honey-sriracha glaze (mix 2 tbsp honey with 1 tbsp sriracha). The tropical-sweet combo is unexpected but addictive. Perfect for brunch or dessert-like snacks!
Nutrition facts
Frequently asked questions
Why does the recipe call for day-old rice instead of fresh rice?
Freshly cooked rice is too moist and sticky, which makes the rice balls fall apart when frying. Day-old rice has just the right texture—dry enough to hold its shape but still chewy inside. If you're short on time, spread freshly cooked rice on a tray and refrigerate for 1 hour to dry it out slightly.
Can I make these rice balls without frying in oil?
For a lighter version, bake them at 400°F for 18-20 minutes after shaping and egg-washing. Brush with oil spray halfway through for crispiness. The texture will be different (less crispy, more tender), but still delicious. Air fryers also work well at 375°F for 12-15 minutes, shaking halfway.
How do I fix rice balls that fall apart when frying? This usually happens when the rice mixture is too wet or the egg wash isn't properly coating the balls. First, check your rice—it should hold together when pressed but not be dry. For extra binding, add 1 tbsp cornstarch to the rice mixture. Also,
What's the best way to reheat leftover fried rice balls?
For maximum crispiness, reheat in an air fryer at 375°F for 3-4 minutes or an oven at 350°F for 5-6 minutes. Avoid microwaving—they'll get soggy. If using a skillet, fry in 1/4 inch of oil for 1-2 minutes until crispy again. Pro tip: Spritz with oil spray before reheating for extra crunch.
Can I make these ahead of time for a party?
Yes! Shape and egg-wash the balls, then refrigerate for up to 4 hours before frying. For make-ahead freezer prep, shape the balls, wrap individually in parchment, and freeze for up to 1 month. Fry from frozen, adding 1-2 extra minutes to cooking time. Keep them warm in a 200°F oven** while serving to maintain crispiness.