
Main Courses
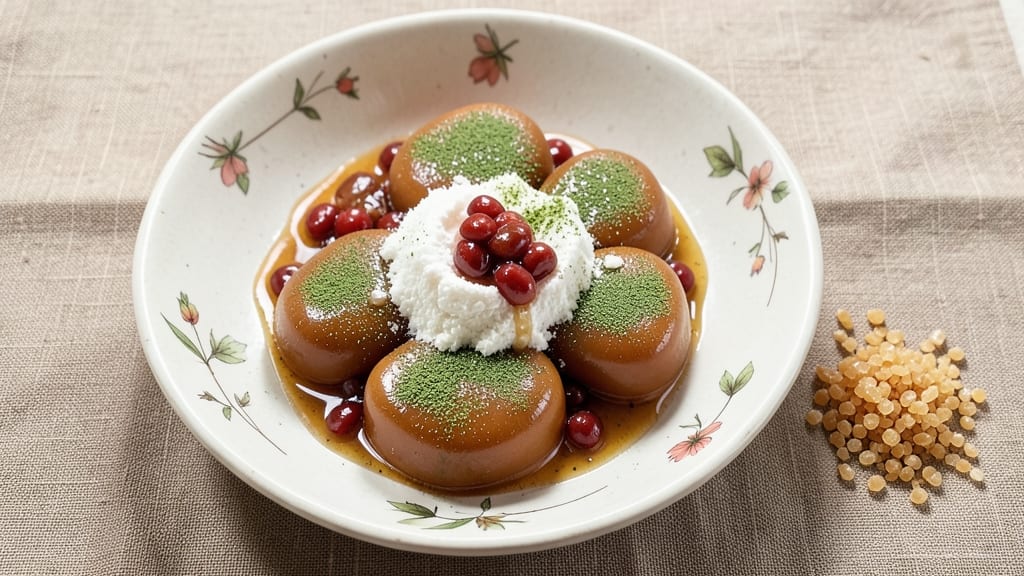
This brown rice flour mochi recipe delivers the perfect balance of chewy texture and nutty depth, all while keeping it vegan-friendly. The secret lies in the right ratio of rice flour and tapioca starch, which creates that signature elastic bite without gluten.
I’ve tested countless variations to ensure these mochi stay soft yet firm enough to handle fillings like sweet red bean paste or modern twists like matcha or fruit purees.
What sets this recipe apart is its foolproof technique for achieving consistent texture—no overworking the dough or guesswork in cooking times. Whether you’re making traditional Japanese mochi or experimenting with flavors, the process is straightforward and yields results that taste like a professional patisserie.
The nutty undertones from brown rice flour add a sophisticated touch, making these bites both comforting and elegant.
Ingredients for brown rice flour mochi
The precise ratio of brown rice flour and tapioca starch creates that signature chewy texture, while nutty undertones elevate these vegan mochi to restaurant-quality bites.
| Ingredient | Amount | Notes |
|---|---|---|
| Brown Rice Flour 🌾 | 1 ½ cups | Gluten-free, finely milled preferred |
| Tapioca Starch 🌾 | ½ cup | For chewy texture, fine mesh preferred |
| Sweet Red Bean Paste 🍫 | 1 ½ cups | Store-bought or homemade vegan version |
| Granulated Sugar 🍚 | ¼ cup | Organic preferred for refined taste |
| Water 💧 | ½ cup | Room temperature for optimal mixing |
| Matcha Powder 🍵 | 1 tbsp | Ceremonial grade for vibrant color |
| Coconut Oil 🥥 | 1 tbsp | Melted for dough pliability |
| Kuzu Powder (Kudzu Root Flour) 🌿 | 1 tbsp | Traditional binder for elasticity |
| Cornstarch 🌾 | ¼ cup | For dusting work surface |
| Vegetable Oil 🫒 | 1 tbsp | For pan coating |
| Sea Salt 🧂 | ¼ tsp | Fine grain for delicate seasoning |
| Black Sesame Seeds 🌱 | 1 tbsp | Toasted for garnish (optional) |
The brown rice flour is the heart of this recipe—Bob's Red Mill or Anthony's Goods brands deliver the finest grind for optimal texture. For tapioca starch, Bob's Red Mill or Arrowhead Mills are reliable choices, ensuring fine mesh consistency. Sweet red bean paste can be store-bought (ensure vegan version) or homemade—Japanese-style azuki beans yield the best texture. The matcha powder should be ceremonial grade from Matcha Kari or Ippodo Tea for vibrant color and superior flavor. Kuzu powder, often found in Asian markets, acts as a traditional binder—if unavailable, agar powder at half the amount works as a substitute. For the sugar, organic brands like Wholesome! sweeten without overpowering the delicate nutty notes of the brown rice flour.
No kuzu powder? Agar powder at half the amount maintains elasticity, though texture will differ slightly. Substituting tapioca starch with potato starch alters chewiness—reduce to 0.375 cup for a closer match. For the bean paste, black sesame paste creates a modern twist, while mango puree offers a tropical variation. The coconut oil can be swapped for vegan butter melted**, though coconut maintains a cleaner flavor profile. When working with the dough, keep your hands lightly dusted with cornstarch to prevent sticking—this is non-negotiable for smooth handling. For a matcha-free version, replace with vanilla extract (1 tsp) or orange zest (1 tbsp) for alternative flavor profiles.
Store the brown rice flour and tapioca starch in airtight containers in a cool, dark place for up to 6 months. The finished mochi should be refrigerated for 3-4 days or frozen for 3 months when wrapped tightly in plastic. For best texture, steam or pan-fresh portions as needed—never reheat fully cooked mochi. The kuzu powder and matcha powder should be refrigerated after opening to preserve potency. When preparing, work in batches to maintain dough consistency, as overworking develops gluten and ruins the delicate texture. These mochi are best enjoyed within 24 hours** of preparation for optimal chewiness.
Why You'll Love This Recipe
- No-Knead Magic: I swear by this dough—just mix, steam, and shape. The brown rice flour gives it a nutty depth while staying light, and the tapioca starch keeps it pillowy without fuss. Honestly, my first batch turned out lumpy, but now I’ve got the rhythm.
- Sweet & Nutty Crunch: That sweet red bean paste? It’s the star—rich, velvety, and just sweet enough to balance the earthy brown rice. The outside gets this satisfying chew, while the center stays soft and melty. (Yes, even on a Tuesday night.)
- Packable & Portable: I make a double batch on Sundays because these stay fresh for days. Wrap them in plastic, toss them in a bag, and they’re perfect for lunches or last-minute gifts. My kids grab them before soccer practice without complaint.
- Budget-Friendly Staple: Brown rice flour and tapioca starch are cheap, and you’ll use them for everything—from pancakes to gluten-free baking. The sugar is minimal, and the red bean paste stretches far. I’ll be real: this is my go-to when I’m broke but still want something special.
Step-by-step instructions for brown rice flour mochi
Mastering this recipe delivers perfectly chewy mochi with nutty depth and vibrant matcha flavor.
Prepare the Mochi Dough Foundation
In a medium mixing bowl, combine the 1.5 cups brown rice flour and 0.5 cup tapioca starch. Sift this mixture twice through a fine-mesh sieve to eliminate any lumps and ensure even distribution. This step creates the perfect gluten-free structure for your mochi.
In a separate small bowl, whisk together the 1.5 cups sweet red bean paste, 0.25 cup granulated sugar, and 0.5 cup room temperature water until completely smooth. The paste should be fully incorporated with no visible streaks. This mixture forms the sweet, velvety center that balances the earthy brown rice flour.
Combine Wet and Dry Ingredients
Create a well in the center of your dry flour mixture and pour in the bean paste mixture. Using a silicone spatula, gently fold the ingredients together until they form a shaggy dough. Avoid overmixing at this stage—just combine until the mixture comes together.
In a small saucepan, gently heat the 1 tbsp coconut oil and 1 tbsp kuzu powder over low heat for 1-2 minutes, stirring constantly until the kuzu powder fully dissolves. This creates a natural binding agent that gives traditional mochi its signature elasticity. Remove from heat and let cool for 2 minutes. Pour this mixture into your dough and knead vigorously by hand for 5-7 minutes until the dough becomes smooth, elastic, and no longer sticks to your hands.
Shape and Steam the Mochi
Lightly dust your work surface with 0.25 cup cornstarch and divide the dough into 4 equal portions. Roll each portion into a 3-inch log about 1.5 inches in diameter. Wrap each log tightly in plastic wrap and refrigerate for 30 minutes to firm up.
After chilling, slice each log into 8 equal pieces (about 1-inch thick). Place a steamer basket in a pot with 1 inch of water and bring to a boil. Steam the mochi for 8-10 minutes until they become translucent and slightly puffed. The edges should be just beginning to set but still maintain a soft center.
Finish with Matcha and Sesame
While the mochi steams, prepare your matcha glaze by whisking 1 tbsp matcha powder with 1 tbsp vegetable oil and 0.25 tsp sea salt until smooth. Once steamed, brush each mochi piece lightly with this mixture, coating all surfaces evenly. The matcha should create a vibrant green sheen without making the mochi soggy.
Toast the 1 tbsp black sesame seeds in a dry skillet over medium heat for 1-2 minutes until fragrant. Sprinkle them immediately over the brushed mochi while they're still warm. Let the mochi cool completely on a wire rack before serving to allow the flavors to fully meld.
Pro Tips For Making Brown Rice Flour Mochi
- Sift the Flour Mix: I learned this the hard way—skipping the sift with brown rice flour and tapioca starch leaves stubborn lumps that ruin the texture. Use a fine-mesh sieve and tap it firmly over the bowl, breaking up any clumps before adding water. The smoother the mix, the chewier your mochi will be.
- Steam Until Springy: Don’t cut into the mochi until it’s actually done. Press the center with your finger—it should bounce back slowly, not feel mushy or sticky. Oversteaming makes it gummy; understeaming leaves it dense. Aim for 20-25 minutes, but check early if your pan is extra hot.
- Chill the Dough: Warm sweet red bean paste is sneaky—it melts into the dough and weakens the structure. Spread the sticky mixture on parchment, then pop it in the fridge for 10 minutes before kneading. Cold paste = firmer dough = easier shaping, no matter how impatient you are.
- Dust Before Rolling: Tapioca starch is slippery, but brown rice flour clings like glue. Lightly dust your rolling pin and surface with extra tapioca starch before each roll, not just the dough. This prevents sticking and keeps your mochi from flattening into pancakes—yes, even if you’re not a pro.
Perfect pairings for this recipe
Traditional Pairings
Serve these mochi with hot Japanese green tea—its delicate bitterness contrasts beautifully with the sweetness and nutty depth. I love pairing them with sencha or gyokuro for an authentic experience.
For a modern twist, hibiscus tea adds a tart, floral note that cuts through the richness of the red bean paste. 🍵
Modern Beverage Pairings
A matcha latte made with oat milk complements the earthy flavors perfectly—use the same ceremonial grade matcha as in your mochi for harmony. For a tropical twist, try lychee juice or passionfruit iced tea, which brighten the nutty undertones.
I also enjoy a lightly sparkling yuzu soda for a refreshing contrast.
Sweet Toppings
Enhance presentation with toasted coconut flakes or crushed pistachios for added crunch. A drizzle of dark chocolate ganache (melt 2 oz vegan dark chocolate with 1 tbsp coconut cream) elevates the dish to dessert-level sophistication. For a fruity touch, add sliced mango or strawberry puree as a topping.
Savory Contrasts
Balance the sweetness with pickled ginger or umeboshi (pickled plum) for a tangy bite. A sprinkle of flaky sea salt right before serving enhances the nutty flavors. For a savory-sweet combo, pair with miso-glazed tofu or grilled shiitake mushrooms—the umami depth complements the mochi beautifully. 🌿
Seasonal Variations
In winter, add cinnamon and orange zest to the dough for warmth. For spring, incorporate fresh strawberry puree as a filling. Summer calls for lychee or mango fillings, while autumn works well with persimmon or chestnut paste.
Each season brings its own delicious twist to this versatile treat.
Nutrition facts
Frequently asked questions
Why does my brown rice flour mochi turn out gummy instead of chewy?
Oversteaming or insufficient tapioca starch causes gumminess. Steam for exactly 8-10 minutes until translucent but still slightly soft inside. For better texture, ensure your ratio is 3:1 brown rice flour to tapioca starch—never substitute with potato starch. Also, avoid overworking the dough during kneading.
Can I make this mochi recipe without kuzu powder?
Yes, but texture will differ slightly. Replace 1 tbsp kuzu powder with 0.5 tbsp agar powder dissolved in 1 tbsp water and cooled. This maintains elasticity, though the chewiness won't be identical. For a gluten-free alternative, try psyllium husk powder (0.5 tbsp) mixed with 1 tbsp water—it adds structure without altering flavor.
How do I store leftover brown rice flour mochi?
Wrap individual mochi tightly in plastic wrap and refrigerate for 3-4 days—they'll lose some chewiness but remain delicious. For longer storage, freeze for up to 3 months. To reheat, steam for 2-3 minutes or microwave for 10-15 seconds (covered with damp paper towel). Never reheat fully cooked mochi in dry heat—it makes them rubbery.
What's the best way to make vegan matcha mochi without eggs?
Skip the eggs entirely and rely on the kuzu powder and tapioca starch for binding. For extra stability, add 1 tbsp aquafaba (chickpea brine) to the dough mixture. The matcha glaze should use vegetable oil instead of butter—whisk 1 tbsp matcha with 1 tbsp oil and 0.25 tsp salt for a silky finish. This method keeps the mochi tender and cohesive.
Can I use white rice flour instead of brown rice flour?
Not recommended—white rice flour lacks the nutty depth that defines this recipe. However, if you must substitute, use half brown rice flour and half white rice flour (0.75 cup each) for a milder flavor. The texture will be slightly less chewy, and the earthy notes will diminish. For a closer match, add 1 tsp toasted sesame oil to the dough to compensate for lost flavor complexity.