
Main Courses
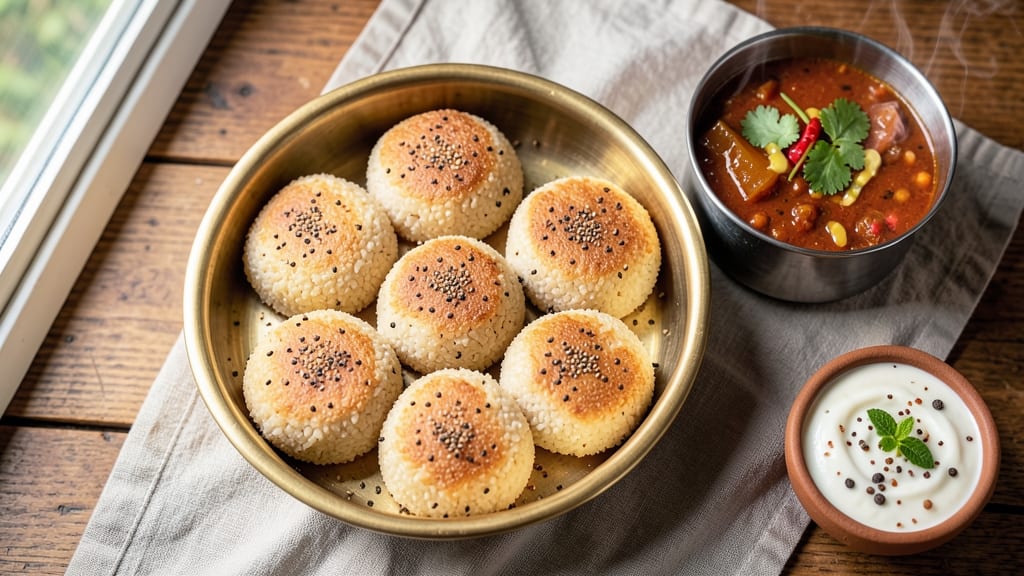
This brown rice idli recipe transforms traditional idlis into a nutritious, vegan powerhouse with a subtle earthy depth. The secret lies in soaking brown rice overnight to unlock its natural chewiness and fermenting the batter for that signature fluffy texture—no shortcuts, just authentic results.
Perfect for breakfast or snacking, these idlis keep well for days and satisfy even the most discerning palates.
What makes this recipe stand out is the balance of traditional technique and modern convenience. You'll achieve the same light, airy idlis you'd find in South Indian homes, but with whole grains that add fiber and protein.
The fermentation process (just 8-12 hours) creates a tangy complexity that pairs beautifully with coconut chutney or spicy sambar. Ready in under an hour after prep, this is comfort food with a nutritional upgrade.
Ingredients for brown rice idli
Twelve ingredients transform traditional idlis into a nutritious, vegan powerhouse with nutty depth and fluffy texture.
| Ingredient | Amount | Notes |
|---|---|---|
| Brown Rice (whole grain) 🌾 | 1 cup | Uncooked, long-grain preferred |
| Urad Dal (black gram) 🌱 | ½ cup | Split, washed thoroughly |
| Rice Flour (fine texture) 🌾 | ¼ cup | For binding and texture |
| Baking Soda 🧪 | ½ tsp | Activates fermentation |
| Asafoetida (hing) 🌿 | ⅛ tsp | Pinch for aroma, optional |
| Cumin Seeds 🌶️ | ¼ tsp | Toasted lightly for warmth |
| Salt 🧂 | ½ tsp | Fine sea salt preferred |
| Water (room temperature) 💧 | 1 ½ cups | For fermentation blend |
| Yogurt (vegan coconut yogurt) 🥛 | ¼ cup | Unsweetened, for fermentation |
| Coconut Oil (melted) 🫒 | 1 tbsp | For greasing idli plates |
| Fresh Fenugreek Leaves (optional) 🌿 | ¼ cup | Chopped, for garnish |
| Lemon Juice 🍋 | 1 tbsp | Freshly squeezed, for tang |
The brown rice is the heart of this recipe—opt for long-grain varieties from specialty stores like Whole Foods or Sprouts for optimal texture. Urad dal must be split and washed thoroughly to remove bitterness; Bob's Red Mill or Patel Brothers carry high-quality options. Rice flour acts as a binder, ensuring the idlis hold their shape while maintaining chewiness. For asafoetida, Patel Brothers or Indian grocery stores offer authentic, potent varieties—this is the secret to that signature South Indian aroma. Cumin seeds should be toasted in a dry pan for 30 seconds to deepen their flavor before grinding, though pre-ground works in a pinch.
No urad dal? Chana dal works in a 1:1 ratio, though texture will differ slightly. Coconut yogurt substitutes beautifully for dairy yogurt—So Delicious or Forager brands are reliable vegan options. Short on fenugreek leaves? Fresh cilantro adds brightness without altering the core flavor profile. Lemon juice can be replaced with apple cider vinegar at the same ratio, though the tang will be more pronounced. Baking soda is non-negotiable for the signature fluffiness—ensure it's fresh (old baking soda loses potency). For coconut oil, Organic Valley or Nutiva brands provide stable, high-quality options that won't smoke at steaming temperatures.
The batter ferments best at room temperature (75-80°F) for 8-12 hours, though colder climates may require up to 16 hours. Store unused batter in an airtight container in the fridge for up to 2 days—bring to room temp before steaming. Idli plates can be reused indefinitely if washed with hot, soapy water and dried thoroughly. These idlis reheat beautifully—microwave for 30 seconds with a damp paper towel for the best texture. Freeze steamed idlis in a single layer before transferring to a bag for up to 1 month; thaw overnight in the fridge before reheating.
Why You'll Love This Recipe
- I swear by this trick: just a quick soak for the brown rice and urad dal (30 minutes max) instead of overnight. That rice flour step? Game-changer for texture—no gummy idlis here, just fluffy perfection with zero fuss.
- No-Soak Nightmare: I swear by this trick: just a quick soak for the brown rice and urad dal (30 minutes max) instead of overnight. That rice flour step? Game-changer for texture—no gummy idlis here, just fluffy perfection with zero fuss.
- Nutty Crunch Factor: Here’s what sold me—the toasted brown rice adds this subtle crunch that regular idlis miss. Pair it with coconut chutney, and that asafoetida (hing) punch? It’s the kind of flavor that lingers without overpowering. My picky eaters actually ask for seconds now.
- Leftover Reinvention: These idlis reheat like a dream—steam them for 2 minutes, and they’re fresh again. I batch-make them on Sundays, then turn them into crispy idli dosas or even idli upma later in the week. Zero waste, all flavor.
Step-by-step instructions for brown rice idli
Master the fermentation process and achieve light, fluffy idlis with nutty depth using these precise techniques.
Soak and Grind the Base Ingredients
Begin by soaking the 1 cup brown rice (whole grain) and 0.5 cup urad dal (black gram) separately in individual bowls of water for 4-5 hours or overnight. The rice should absorb water and become translucent, while the dal should soften noticeably. Drain both thoroughly using a fine-mesh strainer, shaking gently to remove excess water.
Transfer the drained rice and dal to a wet grinder or high-powered blender. Add 1.5 cups room temperature water and grind into a smooth, slightly runny batter. The consistency should resemble heavy cream—thick enough to coat the back of a spoon but still pourable. If needed, adjust with a splash of water, but avoid making it too thin as this affects fermentation quality.
Prepare the Fermentation Mixture
In a large mixing bowl, combine the ground batter with 0.25 cup vegan coconut yogurt and 1 tbsp lemon juice. Stir gently to incorporate, then add 0.5 tsp salt, 0.25 tsp toasted cumin seeds, and 0.125 tsp asafoetida (hing). Mix thoroughly but avoid overworking the batter, which can introduce excess air and disrupt fermentation.
Cover the bowl with a clean kitchen towel or plastic wrap and let ferment at room temperature for 8-10 hours or until the batter rises noticeably and develops a slightly tangy aroma. The ideal fermentation temperature is between 75-85°F—warmer climates may require 6-8 hours, while cooler environments need the full 10-12 hours. Poke the batter with a finger; if it springs back slowly, it's ready.
Activate and Adjust the Batter
Once fermentation is complete, add 0.25 cup rice flour (fine texture) and 0.5 tsp baking soda to the batter. Mix vigorously for 2-3 minutes until the baking soda dissolves completely and the batter becomes light and airy. The baking soda reacts with the acidic fermented batter, creating tiny bubbles that enhance the idli's fluffiness.
At this stage, fold in the 0.25 cup chopped fresh fenugreek leaves (optional) if using. The fenugreek adds a subtle bitterness that balances the nutty brown rice flavor. Cover the bowl again and let rest for 15-20 minutes to allow the baking soda to fully activate. The batter should now have a slightly effervescent texture—this is your signal that it's ready for steaming.
Steam the Idlis to Perfection
Grease idli molds or plates generously with 1 tbsp melted coconut oil, ensuring every crevice is coated. Pour the batter into the molds, filling them about ¾ full. Tap the molds gently on the counter to remove any large air bubbles that may have formed during pouring.
Arrange the molds in a steamer basket, ensuring they don't touch each other or the sides. Bring 2-3 inches of water to a rolling boil in the steamer pot, then place the basket on top. Cover with a tight-fitting lid and steam over medium-high heat for 10-12 minutes. The idlis are done when they rise slightly above the molds and develop a delicate, spongy texture at the edges.
Serve Warm with Traditional Accompaniments
Remove the idlis from the steamer and let them sit in the molds for 2-3 minutes before gently running a knife around the edges to loosen them. Serve immediately while still warm, as they deflate slightly as they cool. The ideal idli should have a soft, fluffy interior with a slight crumbly texture and a delicate, nutty aroma from the brown rice.
Pair with coconut chutney or sambar for a complete meal. The fermentation process enhances the digestibility of the brown rice, making these idlis not only delicious but also nutritious. For best results, consume within 2 hours of steaming when they're at their peak texture and flavor.
Pro Tips For Making Brown Rice Idli
- SOAK RICE LONGER: Brown rice needs at least 12 hours of soaking—yes, even if the recipe says 8. I used to cut it to 10 and wondered why my idlis turned dense. The longer it soaks, the easier it ferments and the lighter the texture. Trust me, set it overnight.
- GRIND WITH WARM WATER: After soaking, rinse the rice and dal, then grind with warm water—not hot, not cold, but just warm. Cold water makes the batter gummy, while hot water kills the fermentation. Warm water keeps the batter smooth and ready for fermentation without extra effort.
- STOP WHEN BATTER DROPS: The perfect batter should drop from a spoon like thick honey—not too loose, not too stiff. I learned this the hard way by overmixing and ending up with dense idlis. Test it early; you can always add a splash of water if needed.
- FERMENT IN A WARM SPOT: Place your idli batter in a warm spot—like near the oven with the light on or wrapped in a towel in a slightly heated microwave. Cold kitchens slow fermentation, and you’ll end up waiting twice as long for the right rise. Speed it up without rushing.
Regional styles of this recipe
Kerala-Style Fermented
In Kerala, brown rice idlis are often made with tender coconut water instead of regular water for soaking. Replace the 1.5 cups water with 1 cup tender coconut water and 0.5 cup water to enhance natural sweetness while maintaining the nutty depth.
Add ½ tsp grated ginger and ¼ tsp black pepper during fermentation for a distinct South Indian flavor profile. 🌿
Tamil Nadu Crispy Edges
Tamil Nadu cooks achieve crispy edges by adding 1 tsp semolina (sooji) to the batter before steaming. Mix it in with the rice flour and baking soda for a subtle crunch.
Their method also includes a 5-minute dry roast of the urad dal with ½ tsp mustard seeds and ½ tsp curry leaves before grinding—this adds aromatic depth that complements the brown rice. 🔥
Andhra Pradesh Spiced
In Andhra Pradesh, the batter includes ½ tsp roasted chana dal powder and ¼ tsp garam masala for warmth. After fermentation, they fold in 2 tbsp finely chopped mint leaves alongside the fenugreek.
The result is a fragrant, slightly spiced idli that pairs beautifully with mint chutney instead of coconut chutney. 🌶️
Karnataka Nutty Twist
Karnataka cooks often substitute ¼ cup of the brown rice with ¼ cup soaked and ground peanuts for added protein and crunch. After steaming, they lightly brush the idlis with melted ghee and sprinkle toasted peanuts on top.
This variation creates a satisfying texture contrast while keeping the fermentation process identical. 🥜
Hyderabadi Mild Ferment
Hyderabadi chefs ferment their batter for only 6-8 hours at room temperature, then finish with a 1-hour cold fermentation in the refrigerator. This creates a milder tang while maintaining fluffiness.
Their secret is adding ½ tsp roasted jeera powder and ¼ tsp cardamom powder to the batter during the final mixing stage. 💛
Modern Fusion Adaptation
For a contemporary twist, replace ½ cup of the brown rice with ½ cup cooked quinoa (cooled) before grinding. Add 1 tbsp nutritional yeast to the batter for an umami boost.
These fusion idlis have a slightly earthier flavor while maintaining the traditional steaming method. Perfect for health-conscious eaters who still want that classic idli experience. 💡
Nutrition facts
Frequently asked questions
Why does brown rice need extra soaking time compared to white rice?
Brown rice has a tougher bran layer that requires 4-5 hours (or overnight) to soften properly. This ensures the idlis develop the ideal chewy texture without becoming mushy. The longer soak also helps break down phytic acid, making the nutrients more digestible.
Can I make brown rice idlis without a wet grinder?
Yes! Use a high-powered blender in batches, adding 1-2 tablespoons of water at a time to prevent overheating. For a smoother texture, strain the batter through a fine-mesh sieve. The key is achieving a batter consistency similar to heavy cream—thick but pourable.
What's the best way to tell if the batter is properly fermented?
Poke the batter with a clean finger—it should spring back slowly (not immediately). The surface should also have small bubbles and a slightly tangy aroma. If it smells overly sour or looks flat, extend fermentation by 2-3 more hours. The ideal temperature for fermentation is 75-85°F.
Why did my idlis turn out dense instead of fluffy?
Dense idlis usually result from under-fermented batter, insufficient baking soda, or overmixing after adding it. Ensure your batter ferments for the full 8-12 hours and that the baking soda is fresh. Also, avoid overfilling the molds—fill them only ¾ full for proper expansion.
How can I make these idlis gluten-free?
Replace the 0.25 cup rice flour with 0.25 cup gluten-free oat flour or 0.2 cup certified gluten-free cornstarch. The fermentation process and steaming method remain identical. Always verify that all your ingredients (like baking soda) are certified gluten-free.