
Desserts
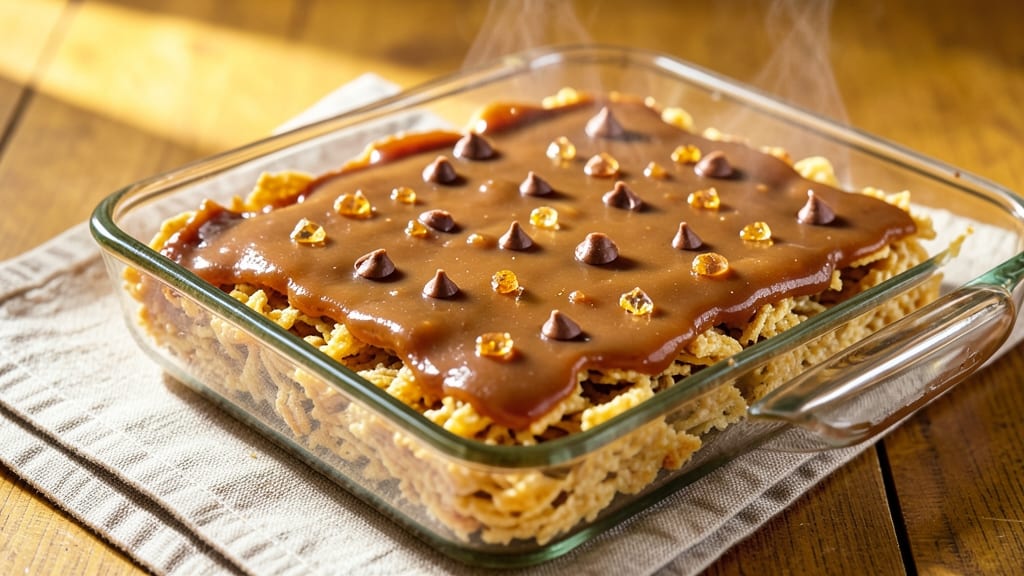
This butterscotch Rice Krispie bars recipe delivers the perfect balance of caramelized sweetness and crispy cereal layers—no one will guess it's made with just a few pantry staples.
The secret lies in melting butter and butterscotch chips together until perfectly smooth, creating a rich, golden coating that binds every crispy Rice Krispie into a cohesive, melt-in-your-mouth treat.
What makes these bars stand out is the deep butterscotch flavor infused throughout, not just as a topping. By incorporating butterscotch chips into the melted butter mixture, you ensure every bite delivers that signature warm, caramelized taste.
The result? A dessert that's foolproof, satisfying, and impossible to resist—ideal for potlucks, holidays, or whenever you crave a nostalgic yet elevated treat.
Ingredients for butterscotch rice krispie bars
Pantry staples plus one special ingredient—these bars bring nostalgic crunch with deep caramelized flavor.
| Ingredient | Amount | Notes |
|---|---|---|
| Butterscotch Chips 🍬 | 1 ½ cups | High-quality for rich flavor |
| Unsalted Butter 🧈 | 1 cup | Salted works too (reduce salt later) |
| Rice Krispies Cereal 🍚 | 6 cups | Original flavor preferred |
| Granulated Sugar 🍚 | ½ cup | Light brown adds depth |
| Heavy Cream 🥛 | ¼ cup | Full-fat for creaminess |
| Vanilla Extract 🌿 | 1 tsp | Pure vanilla preferred |
| Salt 🧂 | ¼ tsp | Kosher or sea salt |
| Butter Flavoring (optional) 🧈 | ½ tsp | Enhances butterscotch notes |
The butterscotch chips are non-negotiable here. Trader Joe's or Ghirardelli brands melt beautifully—avoid the generic store brands, which can be waxy and lack flavor. Unsalted butter gives you full control over the saltiness, but if you're using salted, just taste and adjust at the end. For the Rice Krispies, the original flavor is a must—they're crispier and have a cleaner taste than the other varieties. Pro tip: Toast your cereal lightly in the butter mixture for extra crunch before assembling.
No butterscotch chips? Caramel chips or toffee bits work in a pinch, though the flavor won't be identical. Running out of butter? Coconut oil or vegan butter works, but it'll have a slightly different texture. The heavy cream can be swapped for half-and-half or evaporated milk if needed, but full-fat is ideal for that rich mouthfeel. And if you're feeling fancy, a pinch of cinnamon in the sugar mixture adds warmth that pairs perfectly with the butterscotch.
These bars keep beautifully for 5 days in an airtight container at room temperature, though they're best enjoyed fresh. For make-ahead convenience, assemble the bars and refrigerate them for up to 2 hours before cutting—this makes slicing cleaner and more precise. If you're prepping for a crowd, wrap individually in parchment paper to keep them crispy. They also freeze well for up to 3 months—just thaw at room temperature before serving.
Why You'll Love This Recipe
- No Melted Mess: I swear by the microwave method—just 30 seconds for the butter and cream, then dump everything in. No oven preheating, no waiting for water to boil, and zero chance of burning the butterscotch chips. Honestly, it’s the kind of recipe that makes me feel like a baking genius even when I’m half-asleep.
- Caramel Crunch Perfection: That buttery, toasted Rice Krispies with the gooey butterscotch swirl? It’s the kind of texture combo that makes you close your eyes mid-bite. The heavy cream keeps it creamy, not dry, while the chips add that rich, fudgy depth—like a grown-up dessert in a bar form.
- Party Crowd Saver: I’ve made these for book club potlucks, holiday gatherings, and even my kid’s soccer team fundraiser. They’re easy to cut into squares, travel well, and disappear fast. Plus, the butterscotch flavor feels fancy enough for a party but simple enough that no one questions why you brought them.
- Leftovers? More Like Zero Leftovers: Between us, these rarely last past the first day. But if they do? They’re just as good reheated in the microwave—crispy edges, melty middle, no weird texture shifts. And since they’re made with pantry staples, I’m not stressing about wasted ingredients if I only use half the batch.
Step-by-step instructions for butterscotch Rice Krispie bars
Here's how to make these rich, buttery bars with perfect caramelized layers—no shortcuts, just foolproof technique.
Melt Butter and Sugar for the Caramel Base
In a large saucepan, combine the 1 cup unsalted butter, 0.5 cup granulated sugar, 0.25 cup heavy cream, and 0.25 tsp salt. Place over medium heat and stir constantly with a wooden spoon until everything melts completely. This should take about 5 minutes—watch closely so it doesn't burn.
Once melted, bring the mixture to a gentle boil. Let it boil uninterrupted for 3 minutes, stirring occasionally, until it thickens slightly and turns a deep golden color. The sugar will caramelize, creating that signature butterscotch flavor. If using the 0.5 tsp butter flavoring, stir it in now for extra depth. Remove from heat immediately after boiling—overcooking makes it grainy.
Stir in Vanilla and Butterscotch Chips
Return the pan to low heat and stir in the 1 tsp vanilla extract. Let it simmer for 1 minute to blend the flavors. Then, reduce heat to lowest setting and gently fold in the 1.5 cups butterscotch chips, stirring until they're fully melted and evenly distributed. The mixture should coat the back of a spoon smoothly.
Here's the thing—if the chips don't melt completely, that's okay. A few unmelted chips add texture. But if you have too many, strain the mixture through a fine-mesh sieve to remove any large chunks. Let the caramel cool slightly for 5 minutes while you prepare the cereal layer.
Assemble the Bars in a Greased Pan
Lightly grease an 8x8-inch baking dish with butter or line it with parchment paper for easy removal. Spread the 6 cups Rice Krispies cereal evenly across the bottom of the pan, pressing down gently to create a compact base. This prevents the cereal from floating when you add the hot caramel.
Pour the cooled caramel mixture over the cereal, spreading it evenly with a spatula. Tap the pan gently on the counter to help the cereal absorb the liquid. The bars should look glossy but not overly wet—if they do, let them sit for 5 more minutes to thicken slightly. This step ensures every bite has that perfect crunchy-tooefy texture.
Press and Chill for Perfect Texture
Using a second spatula or your hands (wear oven mitts—the pan is warm), press the cereal and caramel mixture firmly and evenly into the pan. You want it compact but not packed too tightly, or the bars will be dense. Press down gently in the center first, then work your way to the edges to avoid air pockets.
Let the bars cool completely in the pan at room temperature for 1 hour. Then, refrigerate for at least 2 hours (or overnight) to set. This chilling time is non-negotiable—it lets the caramel firm up and the layers bond properly. If you're impatient, freeze them for 30 minutes as a shortcut, but they won't be as crisp.
Cut and Serve with Confidence
Once fully chilled, remove the bars from the pan by lifting the parchment paper (if used) or running a knife around the edges. Use a sharp knife or pizza cutter to slice into 16 equal bars. For clean cuts, dip the knife in hot water, wipe dry, and press straight down without sawing.
Serve at room temperature for the best texture—the caramel should be firm but still gooey in the center, and the cereal should be crispy around the edges. Store leftovers in an airtight container at room temperature for up to 5 days, or freeze for 2 months. These bars are worth the wait!
Pro Tips For Making Butterscotch Rice Krispie Bars
- Melt Butter Slowly: I learned this the hard way—dumping cold butter into the pot with sugar and cream makes a greasy mess. Instead, melt the butter first over low heat, then add the sugar and cream. The mixture will thicken smoothly, and you’ll avoid that sad, lumpy texture that ruins the whole thing.
- Chop Chips Finely: Butterscotch chips are the star, so don’t skimp on prep. Pulse them in a food processor until they’re tiny, crumbly bits—think fine sand, not pebbles. This ensures even distribution and a creamy texture in every bite, not just pockets of gooey chip.
- Press Bars Firmly: The first time I made these, I just dumped the cereal into the pan and called it done. Big mistake. Pack the Rice Krispies tightly into the pan—press them down with a spatula or your hands. This prevents crumbling when cutting and guarantees clean slices (yes, even if you’re impatient like me).
- Skip the Extra Cream: Heavy cream adds richness, but too much turns your bars into a soggy disaster. Stick to the recipe’s amount—about ½ cup—and resist the urge to "fix" a dry mixture by adding more. The cereal will crisp up perfectly on its own; extra liquid just invites mushy edges.
Serving suggestions for this butterscotch rice krispie bars
Warm Beverage Pairings
Nothing complements these rich butterscotch bars like a warm cup of coffee or tea. I reach for a light roast coffee like Starbucks Pike Place—its bright acidity cuts through the caramelized sweetness beautifully.
For tea lovers, Earl Grey with its bergamot notes adds a sophisticated citrus contrast. Serve both at 160-170°F to enhance the butterscotch flavor without overpowering it. ☕
Creamy Ice Cream Topping
For a decadent dessert-to-dinner upgrade, serve warm butterscotch bars alongside vanilla bean ice cream. I love Ben & Jerry's Phish Food—its swirls of caramel and cookie dough mirror the butterscotch flavors.
Scoop the ice cream onto a plate, place a bar on top, and drizzle with warm caramel sauce for an instant crowd-pleaser. 🍦
Chilled Milk or Cream
If you prefer something lighter, a cold glass of whole milk or heavy cream lets the butterscotch flavors shine. I often pour cold milk over the bars when serving them at summer potlucks—it creates a refreshing contrast.
For an adult twist, swap milk for vanilla chilled cream and add a splash of bourbon (about ½ tsp) for a sophisticated touch. 🥛
Spiced Whipped Cream
Take your presentation to the next level with spiced whipped cream. Whip 1 cup heavy cream with 1 tsp vanilla, ¼ tsp cinnamon, and pinch of nutmeg until stiff peaks form.
Pipe dollops alongside the bars or on top for a festive finish. The warmth of the spices enhances the butterscotch depth without overpowering it. ✨
Seasonal Fruit Accents
For a fresh contrast, add sliced apples or pears to the plate. Their crisp texture and natural sweetness balance the richness of the bars. In summer, I use ripe peaches—their juiciness pairs perfectly with the caramelized butterscotch.
In winter, cranberry sauce adds a tart twist that cuts through the sweetness. 🍐
Nutrition facts
Frequently asked questions
Can I substitute butterscotch chips for caramel or toffee bits?
You can use caramel or toffee bits, but the flavor won't be identical. Butterscotch chips melt into a smoother, richer caramel base with a distinct warm, buttery taste. For the closest substitute, use 1.5 cups caramel chips and add ½ tsp butter flavoring to mimic the depth. The texture will be slightly grainier, but it still works in a pinch!
Why do my butterscotch bars turn out too soft or sticky?
This usually happens if the caramel mixture wasn't cooled enough before pressing or if the cereal didn't absorb the liquid properly. Let the caramel cool for 5-10 minutes before assembling, and press the cereal firmly into the pan. For extra crispiness, chill the bars for at least 2 hours (or freeze for 30 minutes) before cutting. Patience is key!
How can I make these bars gluten-free?
Swap the Rice Krispies for gluten-free cereal like Rice Chex or gluten-free cornflakes. The texture will be slightly different but still delicious. For the caramel base, ensure your butterscotch chips and butter are certified gluten-free. Test the cereal first—some brands can be crumbly when pressed. The bars will hold together but may be less crisp.
Can I make these bars ahead of time?
Assemble the bars and refrigerate them for up to 2 days before cutting. For longer storage, freeze the uncut pan for up to 3 months. Thaw at room temperature for 1-2 hours before slicing. Wrap individual bars in parchment paper to keep them crispy. The flavor actually improves over time as the butterscotch caramel deepens!
What’s the secret to clean, crisp cuts?
Use a sharp knife or pizza cutter and dip it in hot water, wipe dry, then press straight down without sawing. For extra precision, chill the bars for 1 extra hour before cutting. If the bars are too soft, freeze them for 15 minutes first. Pro tip: Run the knife under hot water between cuts to prevent sticking and ensure clean lines every time!