
Main Courses
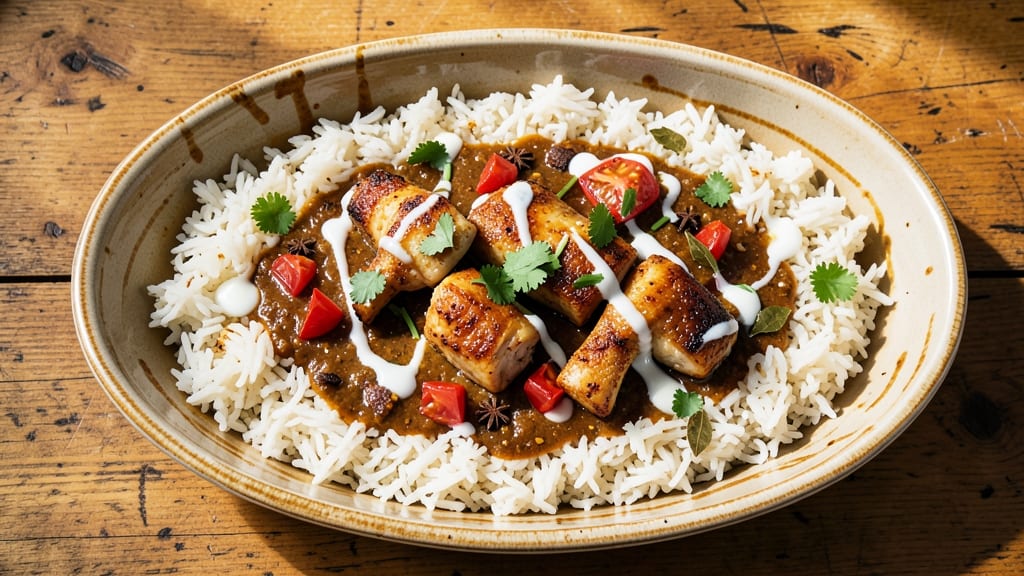
This chicken curry rice casserole recipe transforms weeknight dinner into a restaurant-worthy one-pan wonder with its golden crust and aromatic spiced tomato gravy. 🌟 The secret lies in balancing tender chicken, fragrant curry spices, and perfectly cooked rice—all baked together until the top is crispy and the flavors meld into perfect harmony.
What makes this dish truly special is its simplicity: just one pan means minimal cleanup, while the layered technique delivers restaurant-quality results. The curry sauce simmers until rich and flavorful, coating the chicken and rice in a velvety gravy that's both comforting and complex.
It's the kind of meal that feels indulgent yet comes together with straightforward steps.
By the time it emerges from the oven, you'll have a dish that's impossible to resist—crispy golden edges, tender chicken, and rice infused with warm spices. The aroma alone will have everyone gathering around the table, and the first bite delivers that perfect balance of creamy, spicy, and savory flavors.
This casserole serves as a complete meal, perfect for feeding a family or hosting dinner guests. The leftovers reheat beautifully, making it an ideal make-ahead option for busy schedules. Let's get started on this comforting, flavorful masterpiece that's sure to become a regular on your dinner rotation.
Ingredients for chicken curry rice casserole
Golden crust, velvety gravy, and fragrant spices—just 15 ingredients for restaurant-quality comfort.
| Ingredient | Amount | Notes |
|---|---|---|
| Boneless Chicken Thighs 🍗 | 1 ½ lb | Cut into bite-sized pieces |
| Long-Grain White Rice 🍚 | 2 cups | Uncooked, not instant |
| Canned Diced Tomatoes 🍅 | 14 ½ oz | Fire-roasted preferred |
| Chicken Broth 💧 | 2 cups | Low-sodium preferred |
| Heavy Cream 🥛 | ½ cup | Full-fat for richness |
| Curry Powder 🌶️ | 2 tbsp | Mild or medium heat |
| Ground Cumin 🌿 | 1 tbsp | Toasted for depth |
| Garlic Cloves 🧄 | 4 cloves | Minced or pressed |
| Yellow Onion 🧅 | 1 whole | Diced, medium size |
| Fresh Ginger 🌿 | 1 tbsp | Grated, fresh preferred |
| Butter 🧈 | ½ cup | Melted, unsalted |
| Shredded Mozzarella Cheese 🧀 | 1 ½ cups | Part-skim or whole milk |
| Salt 🧂 | 1 tsp | Kosher or sea salt |
| Black Pepper 🌶️ | ½ tsp | Freshly ground |
| Fresh Cilantro 🌿 | ¼ cup | Chopped, for garnish |
The chicken thighs are non-negotiable here—they stay juicy while the rice cooks. Bone-in, skin-on if you can find it, but boneless works too. For the rice, long-grain white gives the best texture (basmati or jasmine work too). The canned tomatoes? Fire-roasted from Muir Glen adds that smoky depth—don't skip this. Fresh ginger and garlic are worth hunting down at Whole Foods or your local Asian market if you want that restaurant-level flavor punch. The butter? Plugrá or Kerrygold melt beautifully for that golden crust.
No curry powder? Mix 1 tbsp each of coriander, turmeric, and paprika—it's not identical, but it works. Heavy cream too expensive? Coconut milk gives a similar richness, though the flavor shifts slightly. Short on mozzarella? Parmesan or cheddar add great flavor too (just reduce to 1 cup). The cilantro? Fresh is best, but dried oregano at half the amount works in a pinch. For the onions, yellow or red both work—just dice them evenly. And if you're using instant rice? Don't—it turns mushy when baked.
This casserole tastes even better the next day—make a double batch and freeze half. The golden crust stays crispy for 3 days in the fridge, but the gravy gets richer overnight. For reheating, cover with foil and bake at 350°F for 20 minutes—the crust will crisp up again. Portion into individual baking dishes for easy meal prep. The spices keep for 6 months in a cool, dark place, but the fresh ginger and garlic should be used within 2 weeks for best flavor.
Why You'll Love This Recipe
- One-Pot Magic: I swear by this recipe when I don’t want to dirty three pans. Toss everything—chicken, rice, tomatoes, broth—into one dish, cover it, and let the oven do the work. The rice soaks up all that rich, creamy curry flavor without sticking or burning.
- Creamy Spice Bomb: That heavy cream at the end? It turns this into something luxurious. The tomatoes add a tangy depth, while the chicken thighs stay juicy—no dry, sad curry here. Honestly, it’s the kind of dish that makes me want to eat straight from the pan.
- Meal Prep MVP: Make a double batch on Sunday, and you’ve got lunch for the week. The flavors actually get better the next day as everything melds together. My kids grab it cold from the fridge, and no one complains—(yes, even on a Tuesday night).
- Budget-Friendly Feast: Chicken thighs stretch further than breasts, canned tomatoes save money, and heavy cream makes it feel special without breaking the bank. This feeds four for under $15, and leftovers taste just as good reheated. Not the prettiest, but the taste makes up for it every time.
Step-by-step instructions for chicken curry rice casserole
This one-pan wonder delivers golden crust perfection with aromatic spiced tomato gravy—no fuss, all flavor!
🍳 Step 1: Sear the Chicken for Maximum Flavor
Heat a large oven-safe skillet over medium-high heat and add 0.5 cup butter. Once the butter foams, add the 1.5 lb boneless chicken thighs cut into bite-sized pieces. Cook for 5-6 minutes until the chicken is golden brown on all sides and cooked through.
Here's the thing—searing the chicken first builds deep flavor that infuses the entire casserole. Don't overcrowd the pan, or the chicken will steam instead of brown. Work in batches if needed, but keep the butter hot between additions. Once seared, remove the chicken and set it aside on a plate.
👨🍳 Step 2: Sauté Aromatics Until Fragrant
In the same skillet (no need to wipe it clean—those browned bits are flavor gold), add the 1 whole yellow onion diced and 4 cloves garlic minced. Cook for 3-4 minutes until the onion softens and becomes translucent, then add the 1 tbsp fresh ginger and cook for another 30 seconds until aromatic.
You'll know it's ready when the kitchen fills with that irresistible garlic-ginger aroma. This is where the magic happens—these aromatics form the flavor base for your curry gravy. If the onions start to brown too quickly, reduce the heat slightly. Now's also the time to add the 2 tbsp curry powder and 1 tbsp ground cumin, stirring constantly for 30 seconds to toast the spices and release their oils.
🥘 Step 3: Build the Spiced Tomato Gravy
Pour in the 14.5 oz canned diced tomatoes (with juices), 2 cups chicken broth, and 1 tsp salt. Stir well and bring to a gentle simmer over medium heat for 5 minutes, allowing the flavors to meld together. The mixture should reduce slightly and become thickened.
This is your spiced tomato gravy foundation. You want it to coat the back of a spoon but still be pourable. If it's too thick, add 1-2 tablespoons water to loosen it. The tomatoes should be soft and broken down, releasing their sweetness. Here's where the curry and cumin really sing—give it a taste and adjust seasoning if needed.
🍳 Step 4: Layer and Assemble the Casserole
Return the seared chicken to the skillet and stir to combine with the gravy. In a separate bowl, mix together the 2 cups long-grain white rice and 0.5 cup heavy cream. Spread half of the rice mixture evenly over the chicken and gravy in the skillet, then sprinkle half of the 1.5 cups shredded mozzarella cheese on top.
Repeat with the remaining rice mixture and cheese. The cheese will melt into the rice as it bakes, creating that perfect creamy texture we're after. Press down gently on the top layer to ensure even distribution. This layering technique ensures every bite has tender chicken, flavorful gravy, and creamy rice.
🔥 Step 5: Bake to Golden Crust Perfection
Transfer the skillet to a 375°F preheated oven and bake uncovered for 35-40 minutes until the top is golden brown and crispy, and the rice is tender. The edges should pull away slightly from the pan, indicating the crust has formed.
Here's the moment that matters: the golden crust. If your oven runs hot, you might need to reduce the temperature to 350°F after 20 minutes to prevent burning. The rice should be cooked through and the cheese should be fully melted. Let it rest for 5 minutes before serving—this helps everything set and makes for easier slicing.
🍽️ Step 6: Garnish and Serve
Remove from the oven and let cool for 5 minutes, then sprinkle with 0.25 cup fresh cilantro and an extra pinch of 0.5 tsp black pepper. The cilantro adds a bright, fresh contrast to the rich curry flavors. Serve immediately with a side of naan or crusty bread to soak up that delicious gravy.
Each bite should deliver tender chicken, creamy rice, and that perfect balance of spiced tomato gravy. The golden crust on top is the crowning glory—crispy, cheesy, and utterly irresistible. Leftovers? Even better the next day as the flavors meld even more!
Pro Tips For Making Chicken Curry Rice Casserole
- Salt the Chicken First: Toss those boneless thighs with salt before searing—at least 30 minutes ahead if you can. I used to skip this, and the curry sauce would always taste flat, no matter how much garam masala I added. The salt penetrates deeper, so the flavor carries through the long simmer with tomatoes and broth.
- Blister the Rice: Toast the long-grain rice in the dry pan for 2-3 minutes until it smells nutty and starts sticking in spots. This isn’t about browning—it’s about locking in moisture so your casserole doesn’t turn into a gluey mess later. (Yes, even if you’re impatient like me.)
- Strain the Heavy Cream: After simmering the curry sauce, let it cool just enough to strain out the solids—tomato bits, chicken skin, or overcooked rice that sneaks in. Thick, velvety cream is the goal, not a chunky stew. I learned this after serving a batch where someone complained about “bits in my dessert”—oops.
- Layer Rice Last: Build the casserole in this order: chicken, broth, tomatoes, then rice on top. The rice soaks up liquid as it bakes, so adding it last keeps the bottom from turning into a soggy base. (Pro move: Sprinkle a pinch of salt on the rice layer before covering—it melts into the sauce as it cooks.)
Pro cooking tips for this recipe
Butter Browning Magic
The golden crust comes from properly browning the 0.5 cup butter before adding chicken. Heat it over medium-high heat until it turns a rich golden color and smells nutty—this releases flavor compounds that create depth.
I use Plugrá butter because it has higher fat content, which gives that perfect crust. Don’t rush this step—let the butter foam and bubble for 2-3 minutes before adding chicken. 🔥
Spice Toasting Secret
Toast your curry powder and cumin for 30 seconds in the same skillet after sautéing onions. This step amplifies their aromas by releasing essential oils. I stir constantly to prevent burning—over-toasted spices turn bitter.
For extra depth, I add a pinch of black pepper at this stage too. This simple technique makes the difference between good and extraordinary flavor.
Rice Layering Technique
Spread the rice mixture evenly in two thin layers rather than one thick layer. This ensures the center cooks fully while the top develops that golden crust. I press down gently with a spatula to eliminate air pockets, which helps the cheese melt uniformly.
The heavy cream in the rice mixture keeps it moist—don’t skip this! The cheese should be sprinkled evenly between layers for perfect melt-through texture.
Oven Temperature Control
Start at 375°F but watch closely after 20 minutes. If the crust browns too quickly, reduce to 350°F to prevent burning while allowing the center to finish cooking. I use an oven thermometer to verify accuracy—many home ovens run 25°F hotter than set.
The rice should reach 210°F internally for perfect doneness. Let it rest 5 minutes before serving to help the crust set properly.
Cheese Melting Hack
Use part-skim mozzarella for a firmer melt that creates that signature golden crust, but whole milk mozzarella adds extra richness. For an even better result, I pre-shred the cheese—pre-shredded contains anti-caking agents that prevent proper melting.
Sprinkle the cheese just before baking so it melts into the rice rather than sitting on top. The final sprinkle of cilantro adds freshness that cuts through the richness.
Resting for Crispy Perfection
Never skip the 5-minute rest after baking—this allows the crust to firm up and makes slicing easier. The residual heat continues cooking the center while the top stays crispy. I find that resting also helps the gravy thicken slightly, creating that perfect sauce consistency.
Serve immediately with naan bread or crusty sourdough to soak up every last drop of that flavorful gravy. 💫
Nutrition facts
Frequently asked questions
Can I make this casserole with chicken breast instead of thighs?
You can try, but thighs are ideal for this dish. Chicken breast dries out more easily during the long baking time, which could make the casserole less tender. If you must use breast, cut it into small pieces, pound them slightly to even thickness, and bake for 5-10 minutes less to prevent overcooking. For best results, stick with thighs—they stay juicy while the rice cooks.
What if I don't have heavy cream? Can I substitute?
For the creamy texture, use ½ cup full-fat coconut milk (the flavor will shift slightly) or ½ cup Greek yogurt mixed with ¼ cup water. If you're avoiding dairy, ½ cup evaporated milk works well too. Just remember that coconut milk adds a subtle sweetness, while yogurt makes the rice slightly tangy. The rice will still be creamy, but the flavor profile changes.
How do I adjust the spice level for kids or sensitive eaters?
Reduce the curry powder to 1 tablespoon and cumin to ½ teaspoon, then add ½ teaspoon mild paprika for color without heat. For extra mildness, remove the seeds from the tomatoes before adding them. You can also serve the casserole with plain yogurt or sour cream on the side for kids to add as they like. The dish will still be flavorful but much gentler on sensitive palates.
Can I make this casserole ahead of time?
Yes! This dish actually tastes better the next day as the flavors meld. Assemble it completely (including cheese) and refrigerate uncovered for 24 hours before baking. The rice will absorb more liquid, and the cheese will develop deeper flavor. When ready to bake, add 10-15 minutes to the baking time. For freezing, bake first, then cool completely, wrap tightly in foil, and freeze for up to 3 months. Reheat covered at 350°F for 20 minutes.
Why did my casserole turn out dry? What went wrong?
Most likely, the rice didn't cook long enough or the oven was too hot. The rice should reach 210°F internally—use an instant-read thermometer to check. If the top browned too quickly, reduce the oven temperature after 20 minutes. Also,