
Side Dishes
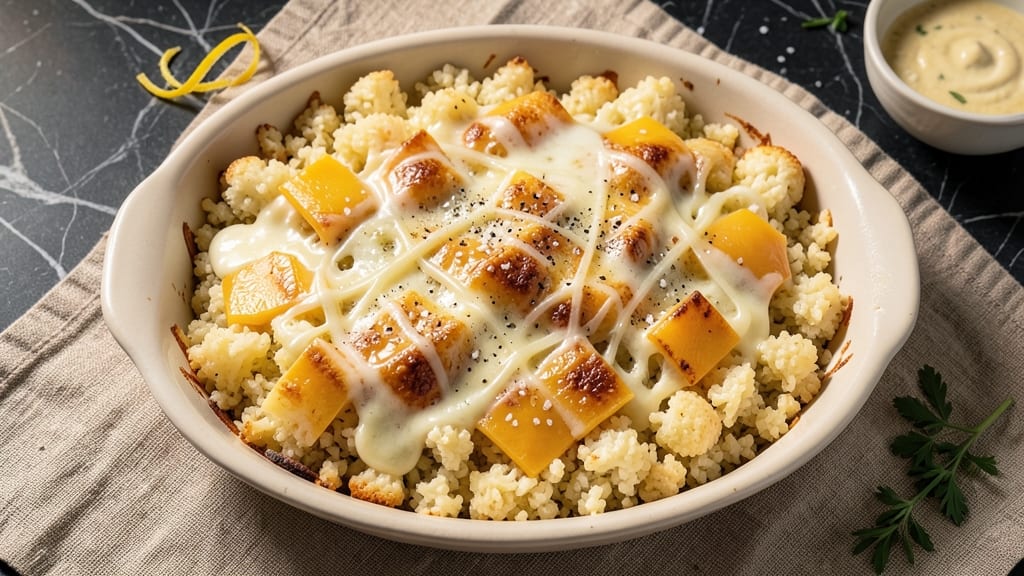
This cauliflower rice casserole recipe delivers the perfect balance of crispy golden edges and creamy cheese filling—transforming a simple vegetable into a showstopping side dish.
The secret lies in layering properly drained cauliflower rice with a rich cheese sauce, then baking until the top achieves that satisfying crunch while the center stays velvety smooth.
I developed this recipe after realizing how versatile cauliflower rice could be beyond stir-fries, and the results consistently impress even picky eaters.
What sets this apart is the two-step baking technique—starting with a lower temperature to melt the cheese evenly, then finishing under the broiler for that irresistible crispy crust. The combination of sharp cheddar, creamy mozzarella, and a touch of mustard powder creates depth of flavor that elevates every bite.
Whether serving at a holiday dinner or as a hearty vegetarian main, this casserole delivers restaurant-quality texture and presentation with minimal effort.
Ingredients for cauliflower rice casserole
Six ingredients transform cauliflower rice into a restaurant-worthy vegetarian casserole.
| Ingredient | Amount | Notes |
|---|---|---|
| Fresh Cauliflower Rice 🥬 | 6 cups | Riced and thoroughly drained |
| Sharp White Cheddar Cheese 🧀 | 2 cups | Shredded, block preferred |
| Mozzarella Cheese 🧀 | 1 ½ cups | Low-moisture, shredded |
| Heavy Cream 🥛 | 1 cup | Full-fat for creaminess |
| Unsalted Butter 🧈 | ½ cup | Cold, cubed for sauce |
| All-Purpose Flour 🌾 | ¼ cup | For sauce thickening |
| Mustard Powder 🌶️ | 1 tsp | For depth of flavor |
| Garlic Powder 🧄 | 1 tsp | Freshly ground preferred |
| Onion Powder 🧅 | 1 tsp | For aromatic base |
| Salt 🧂 | ½ tsp | Diamond Crystal preferred |
| Black Pepper 🌶️ | ¼ tsp | Freshly cracked |
| Panko Breadcrumbs 🍞 | ½ cup | For crispy topping |
| Extra-Virgin Olive Oil 🫒 | 2 tbsp | For crispy topping |
The cauliflower rice must be thoroughly drained—excess moisture ruins the crispy texture. Freshly riced from store-bought cauliflower crowns yields the best results, though pre-riced bags work in a pinch. For the cheeses, block cheddar and low-moisture mozzarella are non-negotiable—pre-shredded contains anti-caking agents that prevent proper melting. I always buy sharp white cheddar from the deli counter at Whole Foods for that tangy punch. The heavy cream should be full-fat; reduced-fat versions won't create the same velvety texture.
No sharp cheddar? Pepper jack or Gruyère add similar depth, though the flavor profile shifts slightly. Substituting cream cheese for mozzarella? Use half the amount and add a splash of milk to compensate for fat content. For the breadcrumbs, panko is essential—its light, airy texture creates the perfect crispy crust. Short on time? Crush saltine crackers for a quick alternative. The mustard powder may seem insignificant, but it's what elevates this from basic to restaurant-quality—don't skip it.
Prep the cauliflower rice first and drain it well before assembling. The casserole keeps 3-4 days in the fridge, though it reheats best when fresh. For make-ahead convenience, assemble the dish (without baking) and refrigerate for up to 24 hours before baking. Leftovers reheat beautifully in the microwave for 1-2 minutes, though oven-baked portions maintain the crispy texture better. Portion into individual ramekins for elegant serving.
Why You'll Love This Recipe
- One-Pan Magic: I swear by this recipe when I’m too tired to wash another dish. Fresh cauliflower rice roasts right alongside the cheesy layers—no separate pans, no fuss. Just toss, bake, and let the butter and cream work their magic while you sip your coffee.
- Creamy Sharp Kick: That sharp white cheddar and melty mozzarella combo? Chef’s kiss. The heavy cream ties it all together, giving it a velvety richness that still feels light—no heavy, greasy aftertaste here. Honestly, the first bite always makes me wonder why I don’t make this every week.
- Lunchbox Hero: Between us, this is my go-to for meal prep. The portions reheat beautifully, and the texture holds up—no soggy cauliflower here. Pack it cold for a picnic or warm it up for a quick office lunch. My kids even ask for it (yes, even the picky ones).
- Budget Stretch: Fresh cauliflower rice is cheaper than regular rice, and a block of sharp cheddar goes a long way. I’ve made this stretch for six people with minimal cost, and the leftovers? Still delicious the next day. It’s my secret weapon for feeding a crowd without breaking the bank.
Step-by-step instructions for cauliflower rice casserole
Here's how to assemble a casserole with a golden, crispy crust and velvety cheese filling.
Prepare the Cauliflower Rice Base
Preheat your oven to 375°F for even baking. In a large bowl, combine the 6 cups fresh cauliflower rice with 1 tsp garlic powder, 1 tsp onion powder, 0.5 tsp salt, and 0.25 tsp black pepper. Toss gently but thoroughly to distribute the seasonings evenly. The cauliflower should be completely dry—any excess moisture will create a soggy casserole.
Real talk: If your cauliflower rice feels damp after ricing, spread it on a clean kitchen towel and gently press to absorb moisture. This step is non-negotiable for that perfect crispy texture. Transfer the seasoned cauliflower to a 9x13-inch baking dish, spreading it evenly in a single layer. Press down lightly with your hands to create an even base for the cheese layer.
Create the Cheese Filling Layer
In a medium saucepan, melt the 0.5 cup unsalted butter over medium heat. Once melted, whisk in the 0.25 cup all-purpose flour to form a roux. Cook for 1-2 minutes until the mixture turns a pale golden color and smells nutty. This is your flavor foundation.
Gradually whisk in the 1 cup heavy cream until smooth, then reduce heat to low and simmer for 3-4 minutes until slightly thickened. Remove from heat and stir in 1 tsp mustard powder. In a separate bowl, combine the 2 cups sharp white cheddar cheese and 1.5 cups mozzarella cheese, then fold this mixture into the warm cream sauce until fully melted and creamy.
Spread this cheese mixture evenly over the prepared cauliflower rice base in the baking dish. Use a spatula to create a smooth, even layer. The cheese should cover all surfaces completely—this prevents dry spots in your final casserole.
Assemble the Crispy Topping
In a small bowl, mix together the 0.5 cup panko breadcrumbs and 2 tbsp extra-virgin olive oil until evenly coated. This oil is crucial for achieving that perfect crispy texture. Sprinkle the breadcrumb mixture evenly over the cheese layer, pressing down gently with your fingers to ensure good contact.
Here's the thing—don't skip pressing the topping. The breadcrumbs need to make direct contact with the cheese to create that satisfying crunch. For extra insurance, you can even press down with the back of a spoon in a grid pattern to create more surface area for browning.
Bake to Golden Perfection
Transfer the baking dish to the preheated oven and bake for 30-35 minutes until the top is deep golden brown and the edges are bubbling. The cheese filling should be completely melted and slightly puffed in the center. If the top isn't browning quickly enough, increase the oven temperature to 400°F for the last 5-10 minutes of baking.
Your casserole is done when the breadcrumb topping is crispy enough to stand up to gentle prodding with a fork. The internal temperature should reach 165°F when measured in the center. Let it rest for 10 minutes before serving—this allows the cheese to set slightly and makes slicing cleaner.
Serve Warm and Enjoy
Use a sharp knife or spatula to cut the casserole into 6 equal portions, dividing it cleanly through the crispy topping. The contrast between the crispy breadcrumb crust and the creamy cheese filling should be perfect—each bite should deliver that satisfying crunch followed by rich, melty cheese.
For best results, serve immediately while still warm. The texture contrast is at its peak right out of the oven. If you need to reheat leftovers, cover with foil and warm in a 350°F oven for 10-15 minutes to restore that crispy texture.
Pro Tips For Making Cauliflower Rice Casserole
- Sauté Cauliflower First: Skip the raw rice—toss freshly grated cauliflower in a dry pan over medium-high heat for 3-4 minutes before mixing with other ingredients. This caramelizes the edges and prevents a soggy, waterlogged casserole later. (Yes, even if you’re impatient like me, don’t skip this—it’s the thing that makes the texture actually hold.)
- Shred Cheese Coarse: Use a box grater for the cheddar and mozzarella, not pre-shredded bags. The finer pre-shredded cheese melts into glue, and you’ll end up with a dense, greasy mess instead of a crispy top. If you’re lazy, buy block cheddar and tear it into uneven chunks—it melts better and looks rustic.
- Don’t Overmix Cream: Once you fold in the heavy cream and butter, stop stirring the second everything looks mostly combined. Overworking it turns the cauliflower into a paste, and the casserole will taste more like cheese sauce than a cheesy, fluffy side. A few lumps are fine—rustic is better here.
- Bake Until Golden: Cover the casserole with foil for the first 20 minutes, then uncover and crank the oven to 425°F (broiler optional) for the last 5-7 minutes. This ensures the top browns and crisps instead of sitting there like a sad, pale pancake. Watch it like a hawk—it burns faster than you think.
Best sauces and condiments for cauliflower rice casserole
Creamy Cheese Sauce
The star of this casserole is the rich cheese sauce, where sharp white cheddar and mozzarella blend with a velvety roux made from butter, flour, and heavy cream.
For extra depth, I add 1 tsp mustard powder—this isn't just for flavor, it helps balance the richness and prevents the sauce from tasting one-dimensional.
If you want to take it up a notch, stir in 1 tbsp fresh lemon juice at the end for a subtle brightness that cuts through the fat. 🧀
Spicy Kick Options
For heat lovers, sprinkle ½ tsp smoked paprika or ¼ tsp cayenne pepper into the cheese sauce before baking. I also like adding 1-2 tbsp of chipotle peppers in adobo sauce for smoky depth—just blend them into the warm cream mixture.
If you prefer milder heat, try ½ tsp hot honey drizzled on top after baking for a sweet-spicy contrast. 🌶️
Herb Infusions
Fresh herbs elevate this casserole from basic to gourmet. Stir 1 tbsp chopped chives or green onions into the cheese sauce for a fresh, oniony brightness. For a more robust flavor, add 1 tsp dried thyme or rosemary to the cauliflower base before baking.
I also love finishing with fresh parsley or basil after baking—just sprinkle it on top right before serving for that restaurant-quality touch. ✨
Umami Boosters
To add depth, stir 1 tbsp nutritional yeast into the cheese sauce for a cheesy, nutty flavor without extra dairy. For savory richness, add 1 tsp soy sauce or Worcestershire sauce to the cauliflower base before baking.
If you have miso paste, mix ½ tsp into the cheese sauce—it's a game-changer for umami lovers. 💫
Sweet Contrasts
Balance the richness with subtle sweetness. Stir 1 tbsp honey or maple syrup into the cheese sauce, or sprinkle toasted pine nuts or walnuts over the breadcrumb topping before baking.
For a caramelized finish, drizzle 2 tbsp balsamic glaze over the top after baking. The sweetness makes the cheesy, crispy flavors sing even more. 🍯
Extra Crispy Toppings
For maximum crunch, swap the breadcrumbs for crushed pork rinds or fried shallots—both add a satisfying crunch without gluten. If you want a nutty twist, use toasted almond flour mixed with olive oil instead of panko.
For a cheesy crunch, sprinkle grated Parmesan** over the breadcrumb topping before baking. 🥜
Nutrition facts
Frequently asked questions
Can I make this casserole ahead of time?
Assemble the casserole completely (including the breadcrumb topping) and refrigerate it uncovered for 24 hours before baking. This helps dry out the cauliflower slightly for better texture. When ready to bake, add 10-15 extra minutes to the baking time since it'll be colder starting. For make-ahead convenience, you can also bake it ahead and reheat covered with foil at 350°F for 10-15 minutes to restore crispiness.
What's the secret to getting that perfect crispy top?
The crispy texture comes from three key steps: thoroughly draining the cauliflower rice, pressing the breadcrumb topping firmly into the cheese, and broiling at the end. For extra insurance, mix 2 tbsp olive oil into the breadcrumbs and press them in a grid pattern. If your oven runs hot, finish under the broiler for 2-3 minutes until golden brown.
Can I use frozen cauliflower rice instead of fresh?
Yes, but with one critical adjustment: thaw and drain it extremely well. Spread frozen cauliflower rice on a paper towel-lined tray and let it air-dry for 10-15 minutes before using. The extra drying time prevents a soggy casserole. For best results, use 1 cup less liquid in the cheese sauce to compensate for any remaining moisture.
How can I make this vegetarian casserole heartier?
Add 1 cup cooked quinoa or brown rice to the cauliflower base for extra substance, or stir ½ cup chopped roasted chickpeas into the cheese sauce. For protein, try ½ cup crumbled feta or goat cheese mixed into the filling. The mustard powder in the recipe already adds depth, but you could also add 1 tsp smoked paprika for a meaty flavor without actual meat.
Why did my casserole turn out soggy?
Soggy texture usually means one of three things: undrained cauliflower rice, too much liquid in the cheese sauce, or not enough baking time. Always press excess moisture out of the cauliflower, and if using pre-shredded cheese, squeeze it in a towel to remove anti-caking agents. For next time, bake at 375°F for 35-40 minutes (not covered) to ensure the top crisps properly.