
Main Courses
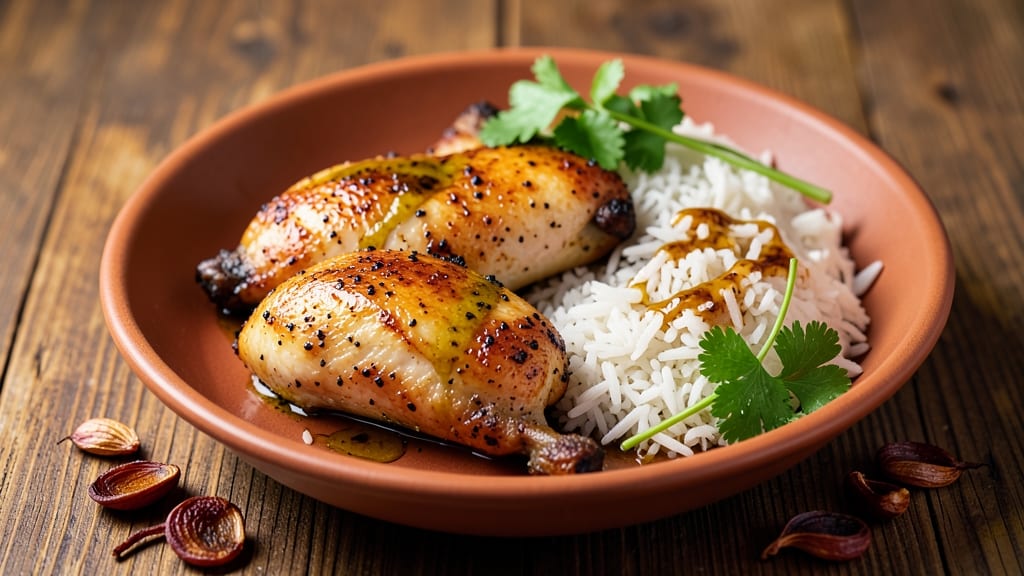
This chicken rice roasted chicken recipe delivers restaurant-quality results with minimal effort—juicy, golden-skinned chicken roasted alongside perfectly seasoned rice in one pan. The secret lies in a simple yet effective dry rub that enhances the chicken's natural flavor while keeping it moist, even at high temperatures.
I've perfected this method over countless weeknight dinners, ensuring every bite is tender and flavorful without requiring advanced techniques.
The beauty of this recipe is its simplicity: no complicated steps, no special equipment, just a foolproof method that yields impressive results. The chicken roasts until the skin is crispy and golden, while the rice absorbs the aromatic flavors from the pan, creating a harmonious one-pan meal.
This approach saves time and cleanup, making it ideal for busy schedules or when you want to impress with minimal effort.
By the time you're done, you'll have a juicy, perfectly roasted chicken with crispy skin, served alongside fragrant, flavorful rice that complements every bite. The dish is versatile—serve it as a standalone meal or pair it with roasted vegetables for a complete, satisfying dinner.
The technique is straightforward, but the outcome is undeniably impressive, proving that great food doesn't have to be complicated.
Whether you're cooking for a family gathering or a quiet weeknight dinner, this recipe delivers consistent, delicious results. The key is patience and attention to detail, particularly when seasoning the chicken and monitoring the roasting process.
With just a few simple ingredients and a little time, you'll have a meal that tastes like it came from a high-end restaurant.
Ingredients for chicken rice roasted chicken
Restaurant-quality chicken and fragrant rice start with these carefully chosen ingredients.
| Ingredient | Amount | Notes |
|---|---|---|
| Boneless, Skin-On Chicken Thighs 🍗 | 1 ½ lb | Pounded to even thickness for crispy skin |
| Long-Grain White Rice 🍚 | 1 ½ cups | Uncooked, jasmine or basmati preferred |
| Chicken Broth 💧 | 2 cups | Low-sodium preferred, homemade or quality store-bought |
| Extra-Virgin Olive Oil 🫒 | ¼ cup | For crisping chicken skin |
| Diamond Crystal Kosher Salt 🧂 | 1 ½ tbsp | Coarse for seasoning, not fine table salt |
| Freshly Ground Black Pepper 🌶️ | 1 tbsp | Coarsely cracked for texture |
| Garlic Cloves 🧄 | 4 cloves | Minced for dry rub |
| Dried Thyme 🌿 | 1 tsp | Or 1 tbsp fresh thyme leaves |
| Smoked Paprika 🌶️ | 1 tsp | For subtle smoky depth |
| Fresh Lemon Juice 🍋 | 2 tbsp | Brightens flavors, freshly squeezed |
| Fresh Parsley 🌿 | ¼ cup | Chopped, for garnish |
| Fresh Rosemary 🌿 | 1 sprig | Whole sprig for aroma |
The chicken thighs are non-negotiable here—bone-in, skin-on pieces develop that coveted crispy skin while staying juicy inside. Look for thighs with good marbling at the grocery store's butcher counter, or ask for them to be pounded to even thickness. Whole Foods or Trader Joe's often carry pre-pounded cuts, saving you time. For the rice, jasmine or basmati varieties release the most aroma when cooked with the chicken. The chicken broth should be rich but not overly salty—Pacific Foods or Swanson are reliable brands for store-bought options. Fresh herbs elevate the dish, so don't skimp on the thyme, parsley, and rosemary—Whole Foods bulk bins offer excellent quality at reasonable prices.
No kosher salt? Diamond Crystal is the gold standard, but Morton coarse sea salt works in a pinch. Running short on fresh thyme? Dried works at one-third the amount, but toast it in the pan first for deeper flavor. The olive oil matters—use something with a good smoke point like California Olive Ranch or Bertolli. For extra crispiness, pound the chicken thighs to 1/4-inch thickness before seasoning. The lemon juice can be substituted with bottled lemon juice if fresh isn't available, though the flavor will be slightly less vibrant. If you're missing smoked paprika, a mix of regular paprika and a pinch of liquid smoke gets close.
This dish reheats beautifully—5 minutes at 350°F with a splash of broth restores moisture. Store leftovers in an airtight container for up to 4 days in the fridge. For longer storage, freeze portions for up to 3 months. The chicken skin stays crispy when reheated if you cover it loosely with foil. I always make double batches—the rice reheats just as well as the chicken, making this perfect for meal prep. Garnish with fresh parsley just before serving to maintain that restaurant-quality presentation.
Why You'll Love This Recipe
- One-Pan Magic: I swear by this—just toss the thighs, rice, and broth on a sheet pan, drizzle with olive oil, and let the oven do the work. No pots, no pans, no stress. (Yes, even on a Tuesday night when I’ve got better things to do than scrub dishes.)
- Crispy-Creamy Obsession: That skin-on thigh? Gold. It renders into crispy perfection while the meat stays juicy, and the rice soaks up all the savory broth like a sponge. Honestly, the first bite makes me forget I’m supposed to be dieting.
- Leftovers That Don’t Suck: This recipe actually improves the next day. The rice gets even fluffier, the chicken more tender, and I’ve sent these leftovers to work with me—no complaints. (Between us, my coworkers think I’m a saint.)
- Budget Meal, Big Payoff: Skin-on thighs and rice? Affordable. Olive oil and salt? Pantry staples. This feeds four for under $15 and leaves me money for actual groceries. Not the prettiest, but the taste makes up for it every time.
Step-by-step instructions for chicken rice roasted chicken
Master this one-pan technique for restaurant-quality chicken with crispy skin and perfectly cooked rice.
Prepare the Chicken for Optimal Crisping
Pat the 1.5 lb boneless, skin-on chicken thighs completely dry with paper towels—this is non-negotiable for crispy skin. I press firmly, even between the skin and meat, to remove all moisture. Place the thighs skin-side down between two sheets of plastic wrap and pound gently with a meat mallet until even thickness. This ensures even cooking and maximum crispiness.
In a small bowl, combine 1.5 tbsp Diamond Crystal kosher salt, 1 tbsp freshly ground black pepper, 4 cloves minced garlic, 1 tsp dried thyme, and 1 tsp smoked paprika. Rub this mixture generously over both sides of the chicken thighs, pressing it into the skin. Let the seasoned chicken rest uncovered on a wire rack for 30 minutes at room temperature—this allows the skin to dry further and the spices to adhere properly.
Sear the Chicken for Deep Flavor
Preheat your oven to 425°F with a rack positioned in the lower third. Heat 0.25 cup extra-virgin olive oil in a large, oven-safe skillet over medium-high heat until shimmering. Place the chicken thighs skin-side down in the pan and cook undisturbed for 8-10 minutes until the skin is deep golden brown and crispy, and the fat begins to render.
Flip the thighs and cook for another 5-6 minutes until the internal temperature reaches 165°F at the thickest part. Remove the chicken and set aside on a plate, leaving the rendered fat in the pan. Here's the thing—don't clean the pan yet. Those browned bits are packed with flavor that will infuse the rice.
Toast the Rice for Enhanced Texture
Add the 1.5 cups long-grain white rice to the same skillet and stir to coat it evenly in the rendered chicken fat. Toast the rice over medium heat for 2-3 minutes, stirring constantly, until it becomes translucent at the edges and fragrant. This step develops nutty flavors in the rice and prevents mushiness.
Pour in the 2 cups chicken broth and bring to a gentle simmer. Stir once to distribute the rice evenly, then immediately place the skillet in the preheated oven. The rice should be submerged by about ¼ inch—if not, add a splash of water. Cover the skillet tightly with aluminum foil and bake for 25 minutes.
Finish with Aromatics and Rest
After 25 minutes, remove the skillet from the oven and carefully stir in the 2 tbsp fresh lemon juice, 1 sprig fresh rosemary, and 0.25 cup chopped fresh parsley. Return the chicken thighs to the skillet, skin-side up, and cover again. Bake for another 10-15 minutes until the rice is tender and the chicken juices run clear when pierced.
Let the entire pan rest covered for 10 minutes before serving. This resting period allows the juices to redistribute, ensuring each bite is moist and flavorful. The skin should remain crispy, the rice perfectly cooked, and the aromatics infused throughout.
Serve with Confidence
Gently fluff the rice with a fork, discarding the rosemary sprig. Spoon the rice onto plates and top each serving with a chicken thigh. The contrast of crispy skin and tender meat paired with fragrant rice creates a harmonious balance. Garnish with additional chopped fresh parsley for brightness and serve immediately.
This method delivers juicy chicken with golden, shatteringly crisp skin while the rice absorbs all the rich flavors from the pan. The key is patience—don't rush the resting period, and let the chicken come to room temperature before cooking. Trust the process, and you'll achieve restaurant-quality results at home.
Pro Tips For Making Chicken Rice Roasted Chicken
- CRISP THE SKIN FIRST: After patting the thighs dry, sear them skin-side down in a cold pan for 8-10 minutes until the skin turns golden and crispy—this is where all the flavor hides. I used to rush this step and wondered why my chicken never tasted as good as takeout. The skin’s crispiness carries through the roast, so don’t skip it, even if it means waiting a little longer.
- SALT THE BROTH LIKE THE OCEAN: Diamond Crystal kosher salt is lighter than table salt, so use twice as much as you think—aim for about 1.5 teaspoons per cup of broth. My grandmother swore by this, and she was right: the rice needs to absorb that saltiness to balance the richness of the chicken. Taste it before adding rice; it should taste bold, not bland.
- DON’T OVERCROWD THE PAN: When roasting the chicken thighs, leave at least a half-inch of space between them—this isn’t a sardine can. I learned this the hard way when my chicken steamed instead of browned, leaving me with sad, pale meat. A single layer on the pan guarantees even cooking and that coveted crispy skin.
- REST THE CHICKEN UNDER FOIL: As soon as the chicken comes out of the oven, tent it loosely with foil and let it rest for 5-10 minutes—yes, even if you’re impatient like me. This keeps the juices from spilling out onto the rice while you finish cooking it. I was skeptical until I tried it, and now I never skip this step. The rice stays flavorful, and the chicken stays moist.
Pro cooking tips for chicken rice roasted chicken
Skin Secrets
For that legendary crispy skin, start by patting the chicken thighs bone-dry with paper towels—this step is absolutely critical. I like to press firmly between the skin and meat to remove all moisture.
After seasoning, let the chicken rest uncovered on a wire rack for 30 minutes at room temperature. This drying time transforms the skin from sticky to perfectly crisp when roasted. 🌟
Temperature Control
Don’t rush the searing process—your oven needs to be fully preheated to 425°F with the rack positioned in the lower third. This ensures even heat distribution and prevents steam from softening the skin prematurely. Use a heavy-bottomed skillet like All-Clad Stainless or Lodge Cast Iron to maintain consistent heat.
Once the chicken is in the pan, resist the urge to flip too soon—wait until the skin is deep golden brown and crispy before turning.
Rice Texture Hacks
Toast the rice in the rendered chicken fat for 2-3 minutes before adding broth—this step develops nutty flavors and prevents mushiness. I stir constantly to avoid burning, and I always check the rice is submerged by about ¼ inch before covering.
If it looks dry, add a splash of water or broth. The rice should be tender and fragrant after 25 minutes in the oven, with no liquid remaining.
Resting Matters
Never skip the 10-minute rest after baking. This allows the juices to redistribute, ensuring each bite is moist and flavorful. During this time, the skin stays crispy while the chicken and rice finish carrying over heat.
I cover the pan loosely with foil to trap heat without trapping steam, which could make the skin soggy. Trust me, the wait is worth it for that perfect texture. ⏰
Equipment Shortcuts
No meat mallet? Use a heavy rolling pin or even a clean wine bottle wrapped in plastic wrap to pound the chicken. For measuring broth, I use a liquid measuring cup with a spout—it makes pouring into the skillet much easier.
If your skillet isn’t oven-safe, transfer the rice to a baking dish after toasting, but don’t skip the fat toasting step. The flavor difference is noticeable!
Flavor Boosters
For extra depth, add a pinch of ground coriander to the dry rub or a splash of soy sauce to the broth. I also like to finish the rice with a few drops of white truffle oil—just a tiny amount adds luxurious flavor.
Fresh herbs like thyme and rosemary should be added at the end to preserve their bright flavors, not during the long cooking process. The key is balance—don’t overpower the natural taste of the chicken and rice. 💫
Nutrition facts
Frequently asked questions
Can I use chicken breasts instead of thighs for this recipe?
While possible, thighs are ideal for this method—they stay juicier and develop better crispy skin. If using breasts, pound them thinner (½-inch) and reduce oven temperature to 375°F to prevent drying out. Cook for 15-20 minutes total instead of 30. The skin may not be as crispy as thighs, but the meat will still be flavorful.
How do I prevent the rice from becoming mushy?
Toast the rice in the chicken fat for 2-3 minutes before adding broth—this builds flavor and prevents mushiness. Use a 1:1.5 ratio of rice to broth (1.5 cups rice to 2 cups broth) and ensure the rice is submerged by ¼ inch when covered. Avoid stirring after the initial toasting to maintain grain integrity.
Can I make this recipe in a slow cooker?
Not ideally—this recipe relies on high-heat searing for crispy skin and toasted rice. For a slow-cooker version, use bone-in chicken, cook on high for 3-4 hours, and serve the chicken over separately cooked rice. The skin won't be crispy, but the meat will stay tender. For best results, stick to the oven method.
What if my chicken skin isn't crispy?
Undercooked skin? Increase oven temp to 450°F for the final 5 minutes uncovered. Still not crispy? Pat the chicken extra dry before seasoning and let it rest 45 minutes uncovered before cooking. For extra crunch, broil for 1-2 minutes at the end (watch closely!).
Can I prep this ahead of time?
Season and refrigerate the chicken overnight for deeper flavor. The day of cooking, let it sit at room temperature for 30 minutes before roasting. For the rice, toast it in the fat ahead of time, then store separately with the broth. When ready to cook, just add the broth and proceed with baking.